Overview
Routes and Waypoints are included in Rockit to make it easier to understand visually the information displayed on the Track panel and to make it possible to calculate a Velocity Made Good On Course (VMC) figure.
Routes can be created in two ways;.
- By manually entering a route in Rockit using the Route screen.
- By collecting data from NMEA Sentences about where the boat is heading. If a boat has a waypoint or route target setup on a chart plotter then that information can be collected.
Waypoint can be created by two routes.
- By entering waypoints manually through the Waypoint entry screens
- By collecting the NMEA data about the current navigation target.
A Route will be a series of Waypoints. Each Waypoint will be a Latitude and Longitude and a name tag.
The Waypoints in a Route will have a sequence, a flag to indicate if they are the next Waypoint and an indicator to say whether they are active within the route.
Routes and Waypoints can be loaded in both the Rockit Desktop and the Rockit Server. It is also possible to bulk load Waypoints from a .csv file.
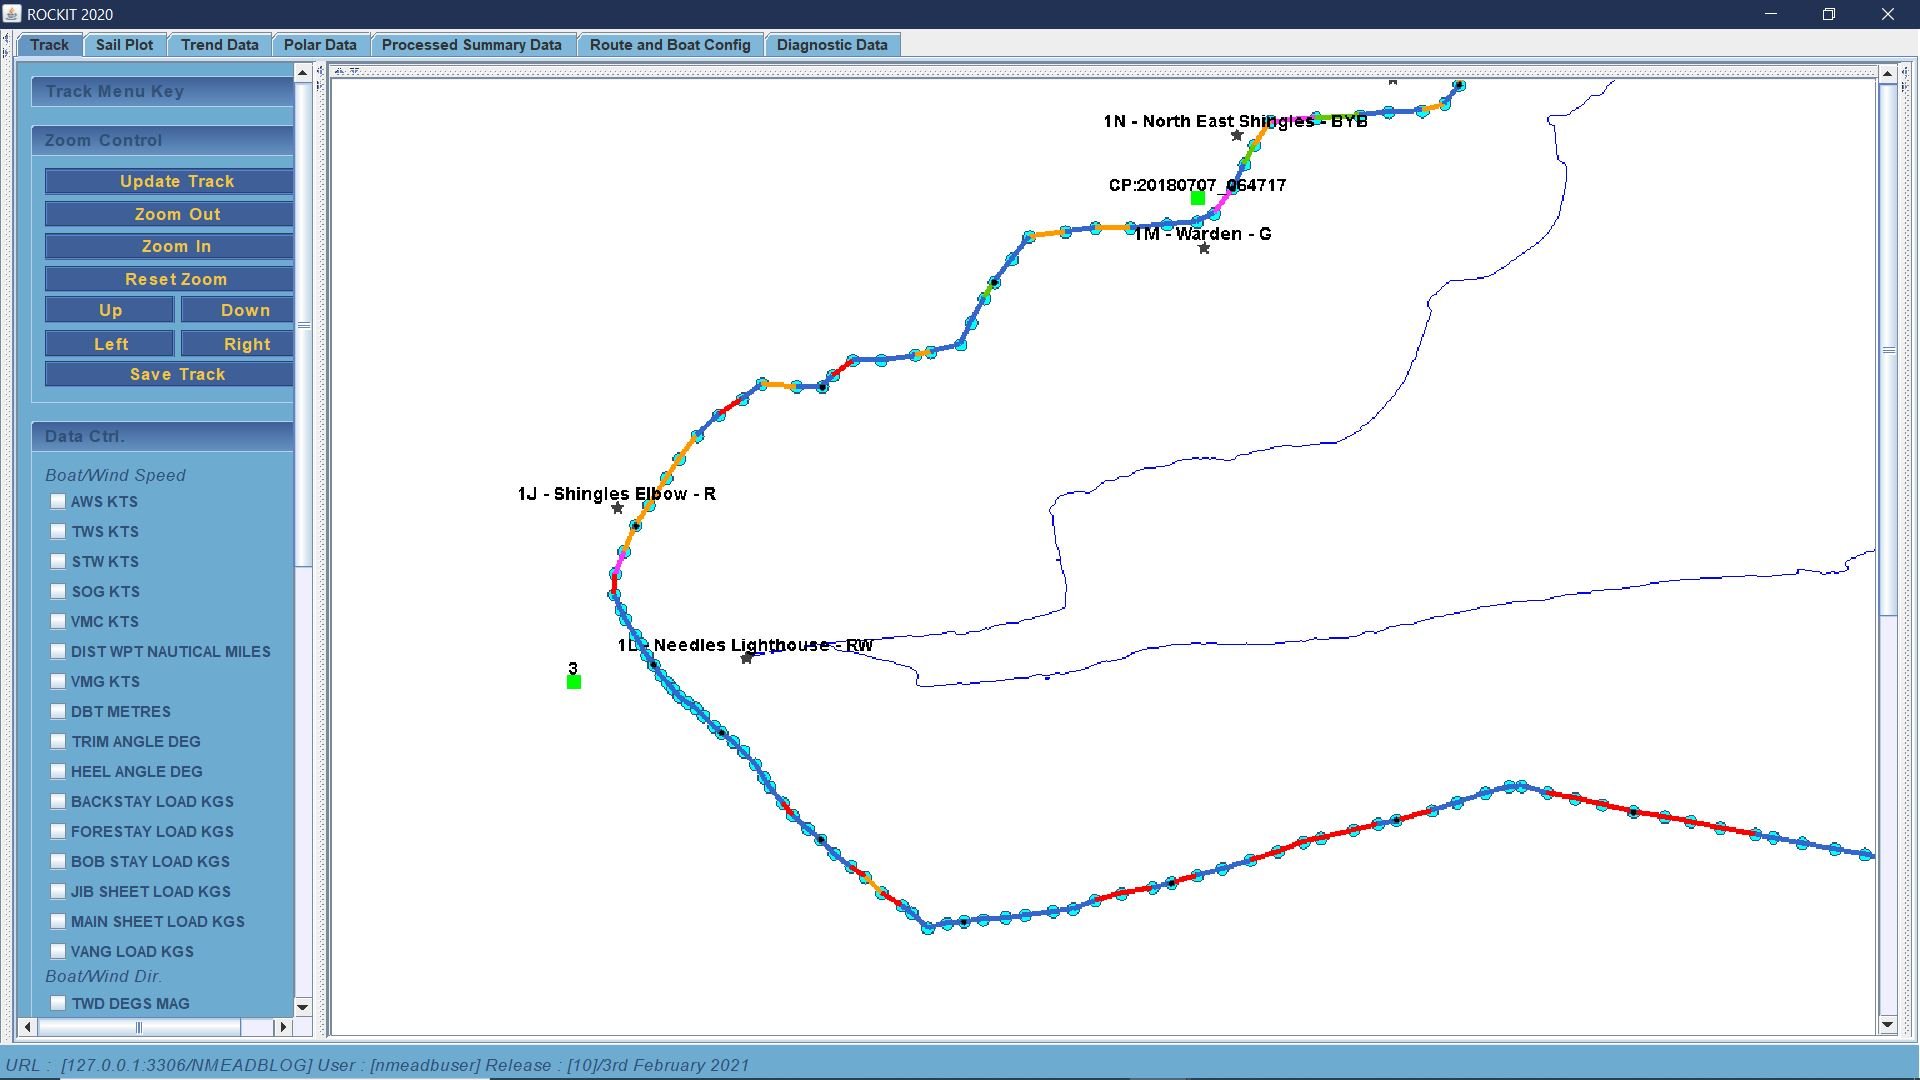
This screen shot shows both the Waypoints on the route (green squares) and other Waypoints defined in the area but not part of the route. (black stars). This is actually the track from the 2018 Round The Island race. The boat went inside of the Varvassi wreck (the track is blue less than 69% of target boat speed, so they went very carefully). There are a combination of manually entered route waypoints on the Track, e.g. Waypoint named 3 and Waypoints from the Chartplotter, named CP:20180707_064717. 1M – Warden – G, 1J – Shingle Elbow and 1N North East Shingles are Waypoints that are not used on this route but are displayed as points of reference.
Waypoints that are collected from the NMEA sentences will be stored with a name in the format CP:YYYYMMDDHHMMSS for example CP:20180421092019. Chart Plotter derived Waypoints are currently only collected from NMEA 0183 feeds. Rockit will extract the target Waypoint information from RMB Sentences. Rockit will also pickup and save Cross Track Error information.
Frustratingly if you give a Waypoint a name on your chart plotter it doesn’t get transmitted as part of the RMB message hence Rockit needs to create its own Waypoint names based on the time that it first receives the Waypoint target information in an RMB Sentence.
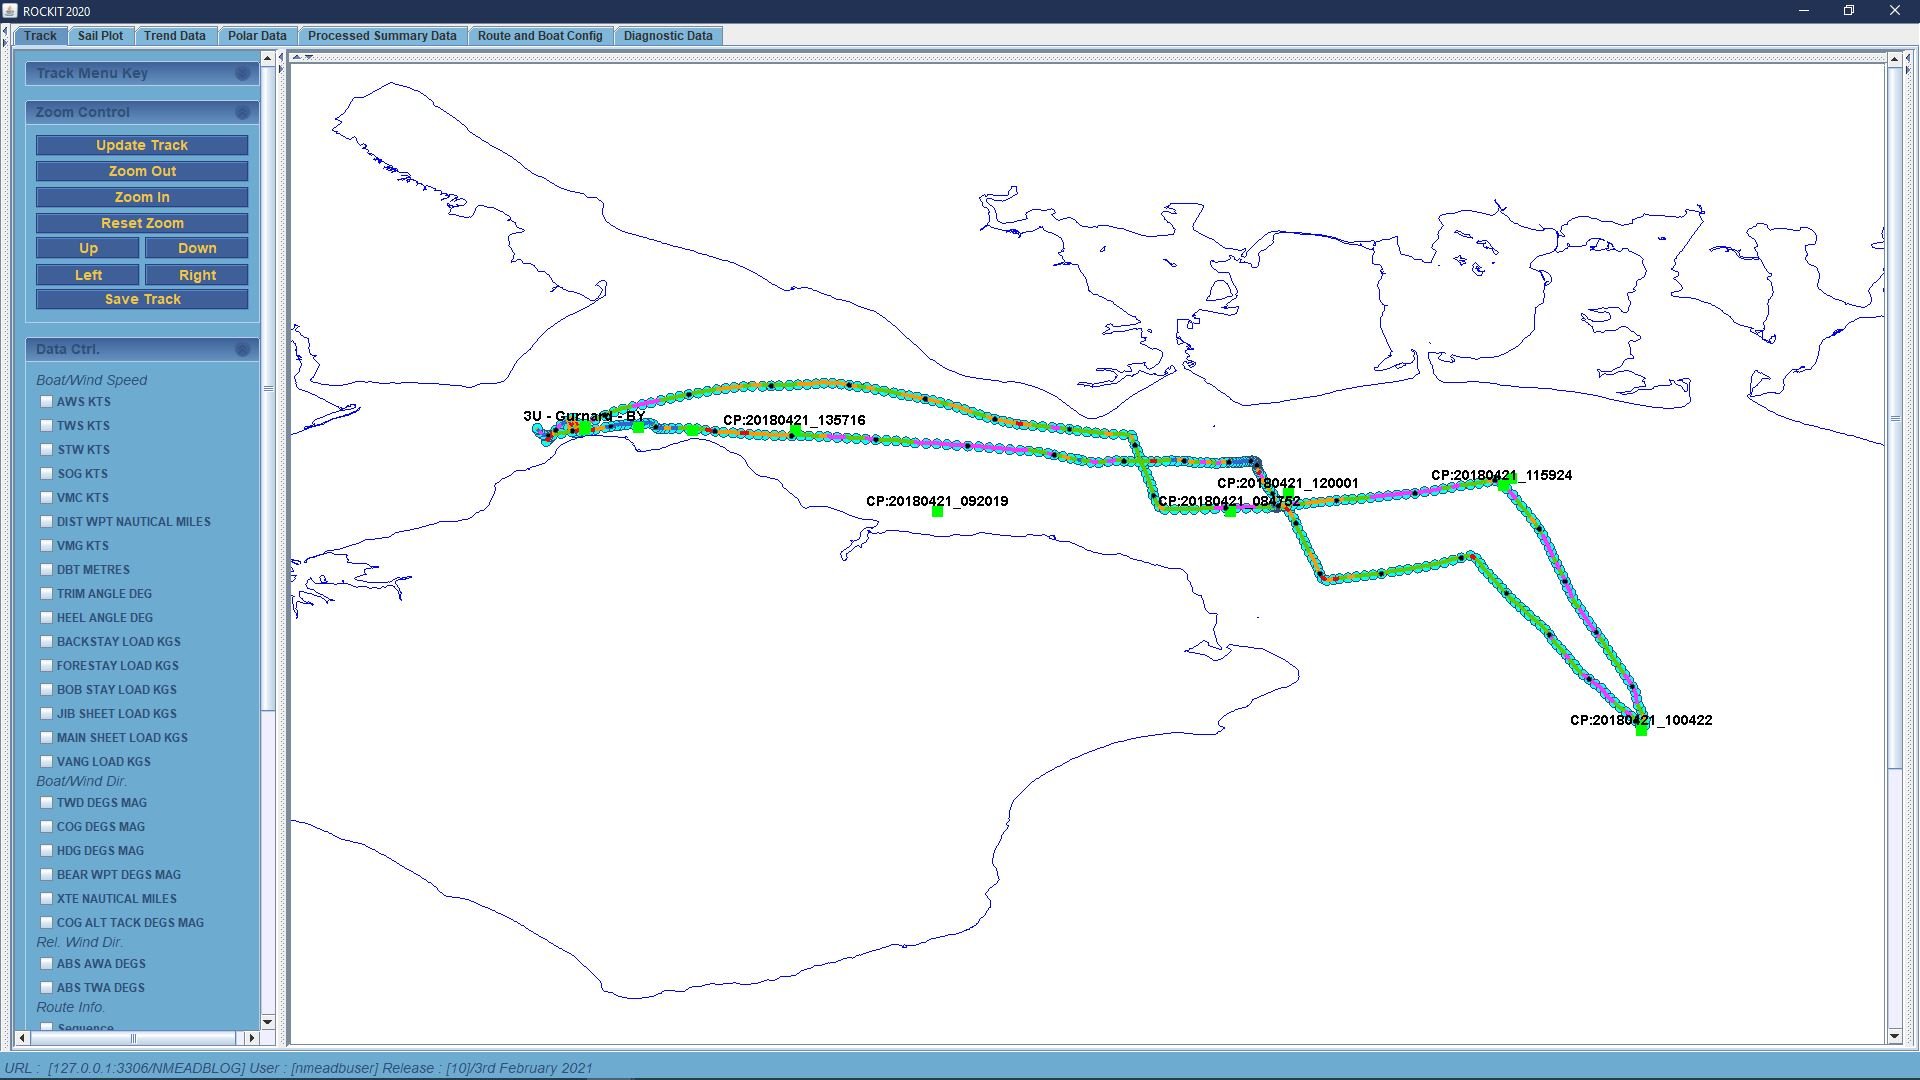
The route below uses a combination of Waypoints collected from the NMEA data and one Gurnard on the extreme left that was pre-entered.
When To Let The Chart Plotter Enter The Waypoints Versus Rockit.
Generally when we race around the cans, especially short windward leeward races we are not putting the mark locations into the chart plotter. So after the event we go back and create a route in Rockit by estimating the locations of the marks.
Racing offshore we will put marks into the chart plotter to give the helm a course to steer (and provide answers to the crews “are we nearly there yet” questions). These will be picked up in the by Rockit within the RMB messages and plotted on the Track Panel.
For the Solent its possible to get a .csv file of the mark from the Solent Cruiser Racing Association. https://www.scra.org.uk/solent-marks/solent-marks2.
If you use the default Session option to record data it will create a new route at the same time. Whether there are any Waypoints within that route will depend on whether there is any Navigation information flowing on the NMEA bus.
Each route when entered consists of a series of waypoints. One of these waypoints will be the ‘Next Waypoint’, the point you are hopefully going to sail towards next. The ‘Velocity Made Good’ (VMG) calculations are based on the declining or increasing distance to this next waypoint. If you don’t record the next waypoint Rockit will calculate meaningless VMG data.
The key point to this is that without a route the system will still calculate the remaining variables. Once you reach the Waypoint you need to update the system so that it then calculates and records the distance to the new next waypoint. You can do this using the ‘Next Waypoint’ button on the control panel of the Interface Definition screen. Rockit has a limited intelligence, So if you sail close to a Waypoint then start sailing towards the next Waypoint it will assume you want to set the next Waypoint as the new target to base its VMG calculations on.

Building a Route In Rockit
To build a route in Rockit you will need a list of Waypoints with their Latitude and Longitude.
Open the Manage Route screen on either the Rockit Server or Rockit Desktop.
This is effectively the same screen on both Rockit Server and Desktop.
The screen has three components.
- A list of existing routes in the system
- When a route is clicked upon in the top list the related Route Waypoints for the route will appear in the bottom half of the screen,
- Clicking on a Route Waypoint row in the lower table will allow its edit in the Waypoint edit form.
Follow the steps below to create a new Route.
First create new blank Route record using the New Route button on the button bar at the foot of the screen. Pressing the new Route button will create a record with the name New Route with the Default status set to No.
Give the route a name. Something that you will be able to remember it by. Most of our test boat routes relate to the race in which they were used. So JOG Nab Tower 2018. You can overtype the NEW ROUTE text to give the route the name that applies to the situation.
Use the Save button on the button bar to save your changes. The Route you have just created should appear in the Route List in the top half of the screen.
Creating and Selecting Waypoints
You can now add Waypoints to your newly created route. Follow the steps below to create a set of Waypoints.
First press the New Route Waypoint button to create a new blank Waypoint record.
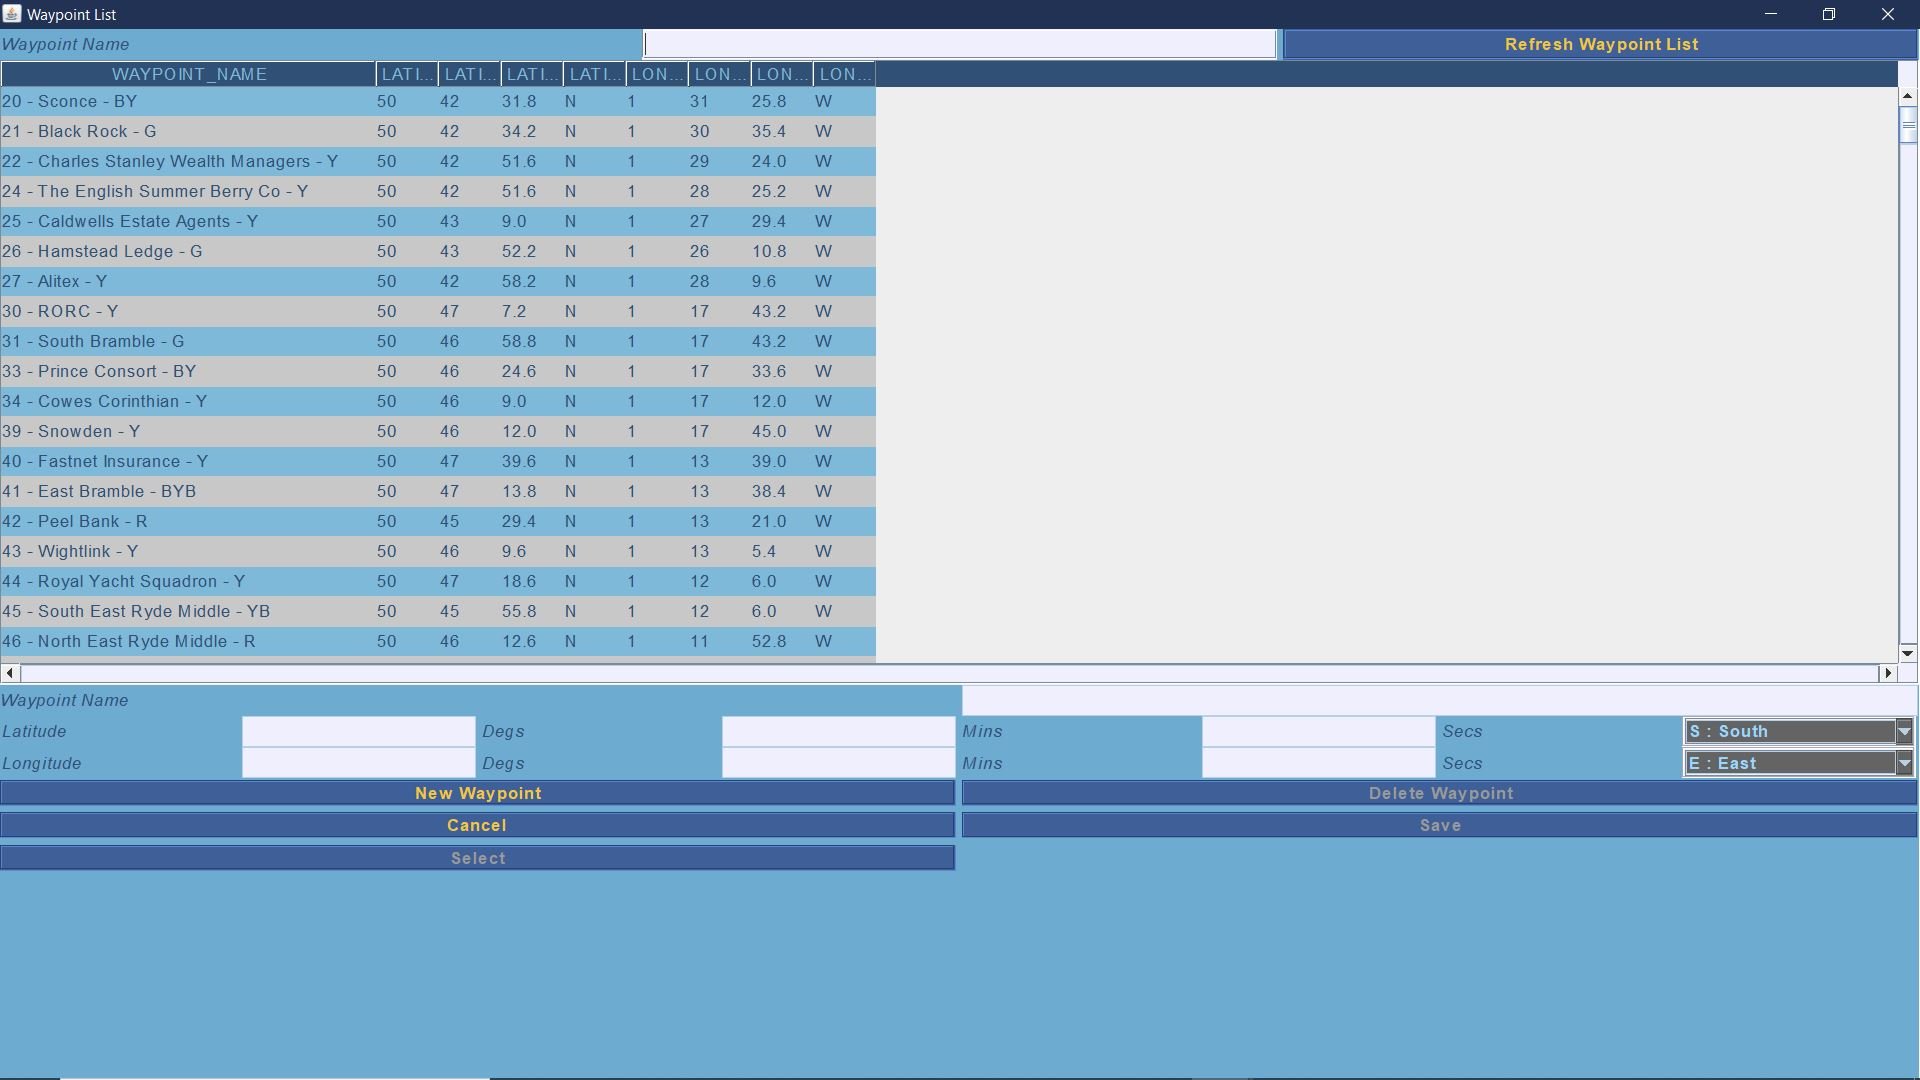
New press the Select Waypoint button to open the Waypoint List.
This will show all the Waypoints that have been entered in the Rockit system; Both those entered manually and those created from NMEA data received.
You have a couple of options here;
You can scroll down the list until you reach the Waypoint you are looking for.
You can use the filter list at the top of the screen to narrow down the Waypoints list returned. For instance if you are looking for the Fastnet Insurance racing mark (40 – Fastnet Insurance – Y) enter 40 – F in the filter box and press Refresh Waypoint List. That would just display Waypoint starting with 40 – F; effectively 1 record in our test data.
or you can create a brand new Waypoint.
Select the Waypoint record in the top table by clicking on the row in the table will bring the details into the form at the bottom of the screen.
To create a new waypoint follow the steps below;
- Press the New Waypoint button.
- Give your Waypoint a name.
- Set the Decimal Latitude Degrees, Minutes and Seconds values.
- Select the Hemisphere.
- Set the Decimal Longitude Degrees, Minutes and Seconds values.
- Select the Hemisphere.
- Press the Save button to save the data.
Your new Waypoint should now appear in the list in the top half of the screen. If you can’t see it make sure you haven’t got a Waypoint Name in the filter box at the top of the screen.
Once you have selected or created your Waypoint on the screen so that it is displayed in the form at the bottom half of the screen you can use the Select button to pull the data back into the Route Edit screen.
Adding Waypoints To The Route
In the previous step we created a new waypoint or selected an existing one and linked the record back to our Route.
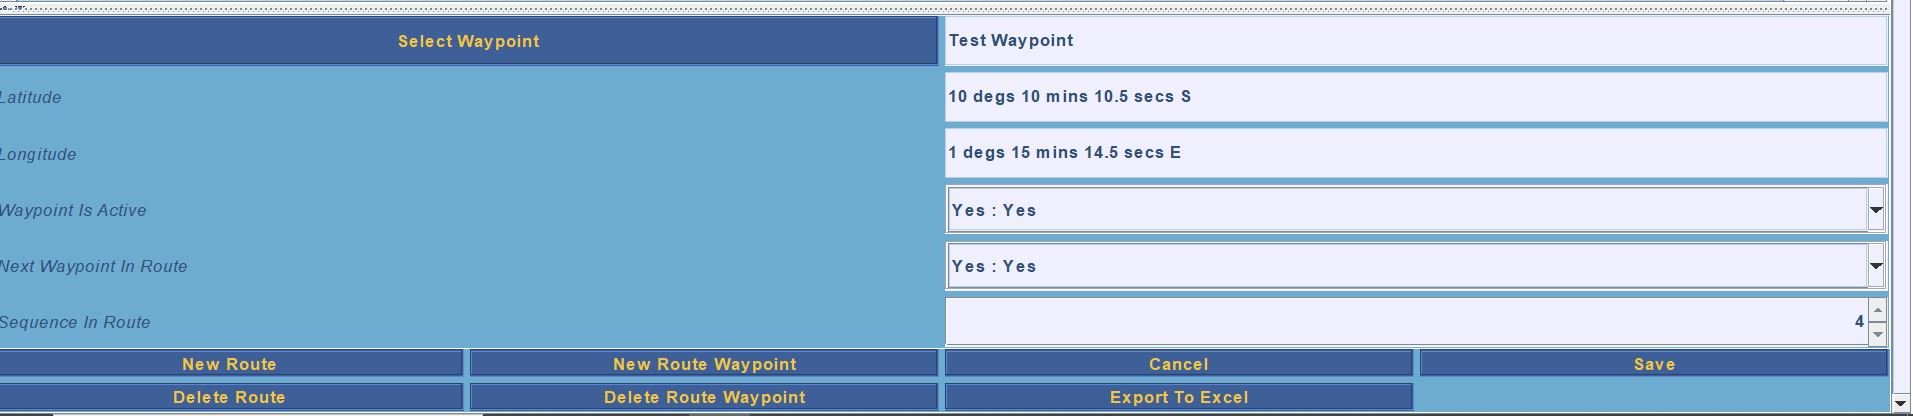
Now that you have a basic Waypoint record you need to set the following information using the Route Waypoint edit panel.
- Waypoint is Active; tells Rockit whether this is Waypoint is actively part of the route. A Waypoint can be in a route in a inactive state which makes it easier to bypass Waypoints in the route if they are not required without removing them from the actual route.
- Waypoint is the next Waypoint. Normally the first Waypoint in the route will be the Next Waypoint.
- The Sequence of the Waypoint in the Route.
- Press Save to add this Route Waypoint data to the Rockit database.
- This will give you a route with a Single Waypoint.
Repeat the process to add further Waypoints into the Route.
Further Notes on Routes
Routing information is optional. But the system must contain at least one valid route. Even if that route only contains a single Waypoint. Without that route you will get errors during the summary data calculation process.
Each route when entered consists of a series of waypoints. One of these waypoints will be the ‘Next Waypoint’, the point you are hopefully going to sail towards next. The ‘Velocity Made Good’ (VMG) calculations are based on the declining or increasing distance to this next waypoint. If you don’t record the next waypoint Rockit will calculate meaningless VMG data.
The key point to this is that without a route the system will still calculate the remaining variables. Once you reach the Waypoint you need to update the system so that it then calculates and records the distance to the new next waypoint. You can do this using the ‘Next Waypoint’ button on the control panel of the Interface Definition screen. Rockit has a limited intelligence, So if you sail close to a Waypoint then start sailing towards the next Waypoint it will assume you want to set the next Waypoint as the new target to base its VMG calculations on.
You can see on the Session Data Display screen’s Route Panel the Waypoint that Rockit considers to be the next one in the route.