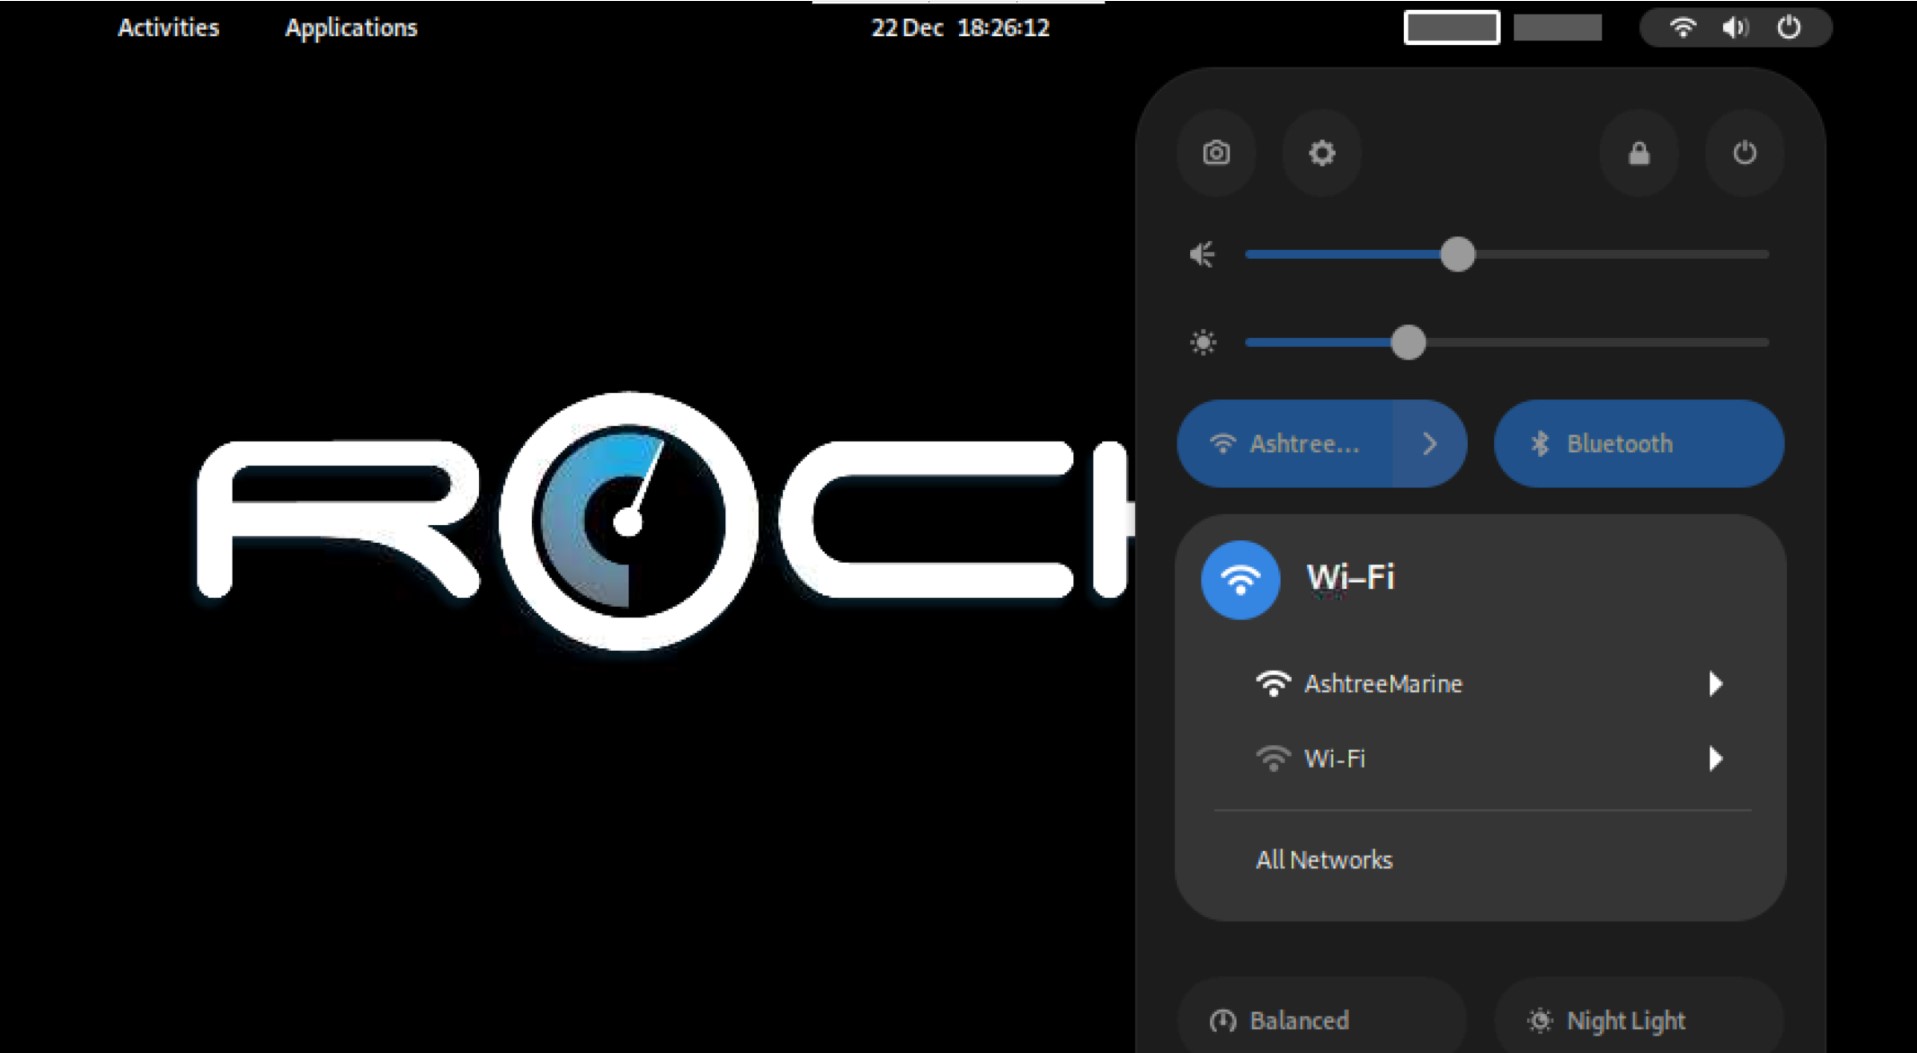
You can use the standard Linux Desktop functions to connect the device to your Wi-Fi hotspot. Both the Model 1 and Model 3 have built in Wi-Fi connectors. Click on the overlapping ellipses in the top right corner of the screen to pull up the control menu. You can also add Bluetooth devices here as well ; the Logitech Trackball should already be connected and we find it the easiest way to control the device also has a touch screen.
The Rockit Server devices use the GNOME desktop software. If you want more more information about how to use GNOME Desktop and to configure the device further the GNOME Help site is a good place to start.
GNOME Help
VNC Viewer Software
You can find out more about VNC Viewer here;
https://www.realvnc.com/en/
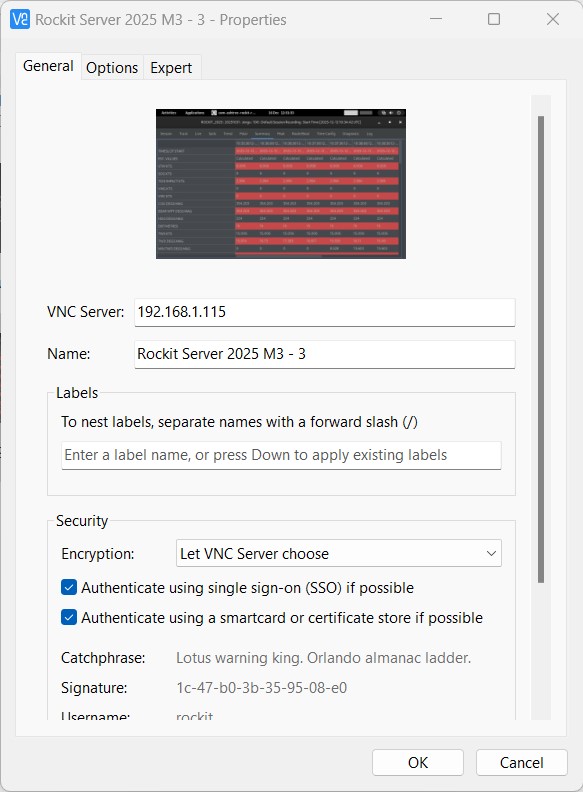
You can use VNC Viewer on your Laptop/Desktop computer to access the Rockit Server device remotely the VNC Server service is setup to run on your Rockit Server. Most of the images in this user guide have been produced by taking screenshots of the Rockit Server over a VNC Viewer connection.
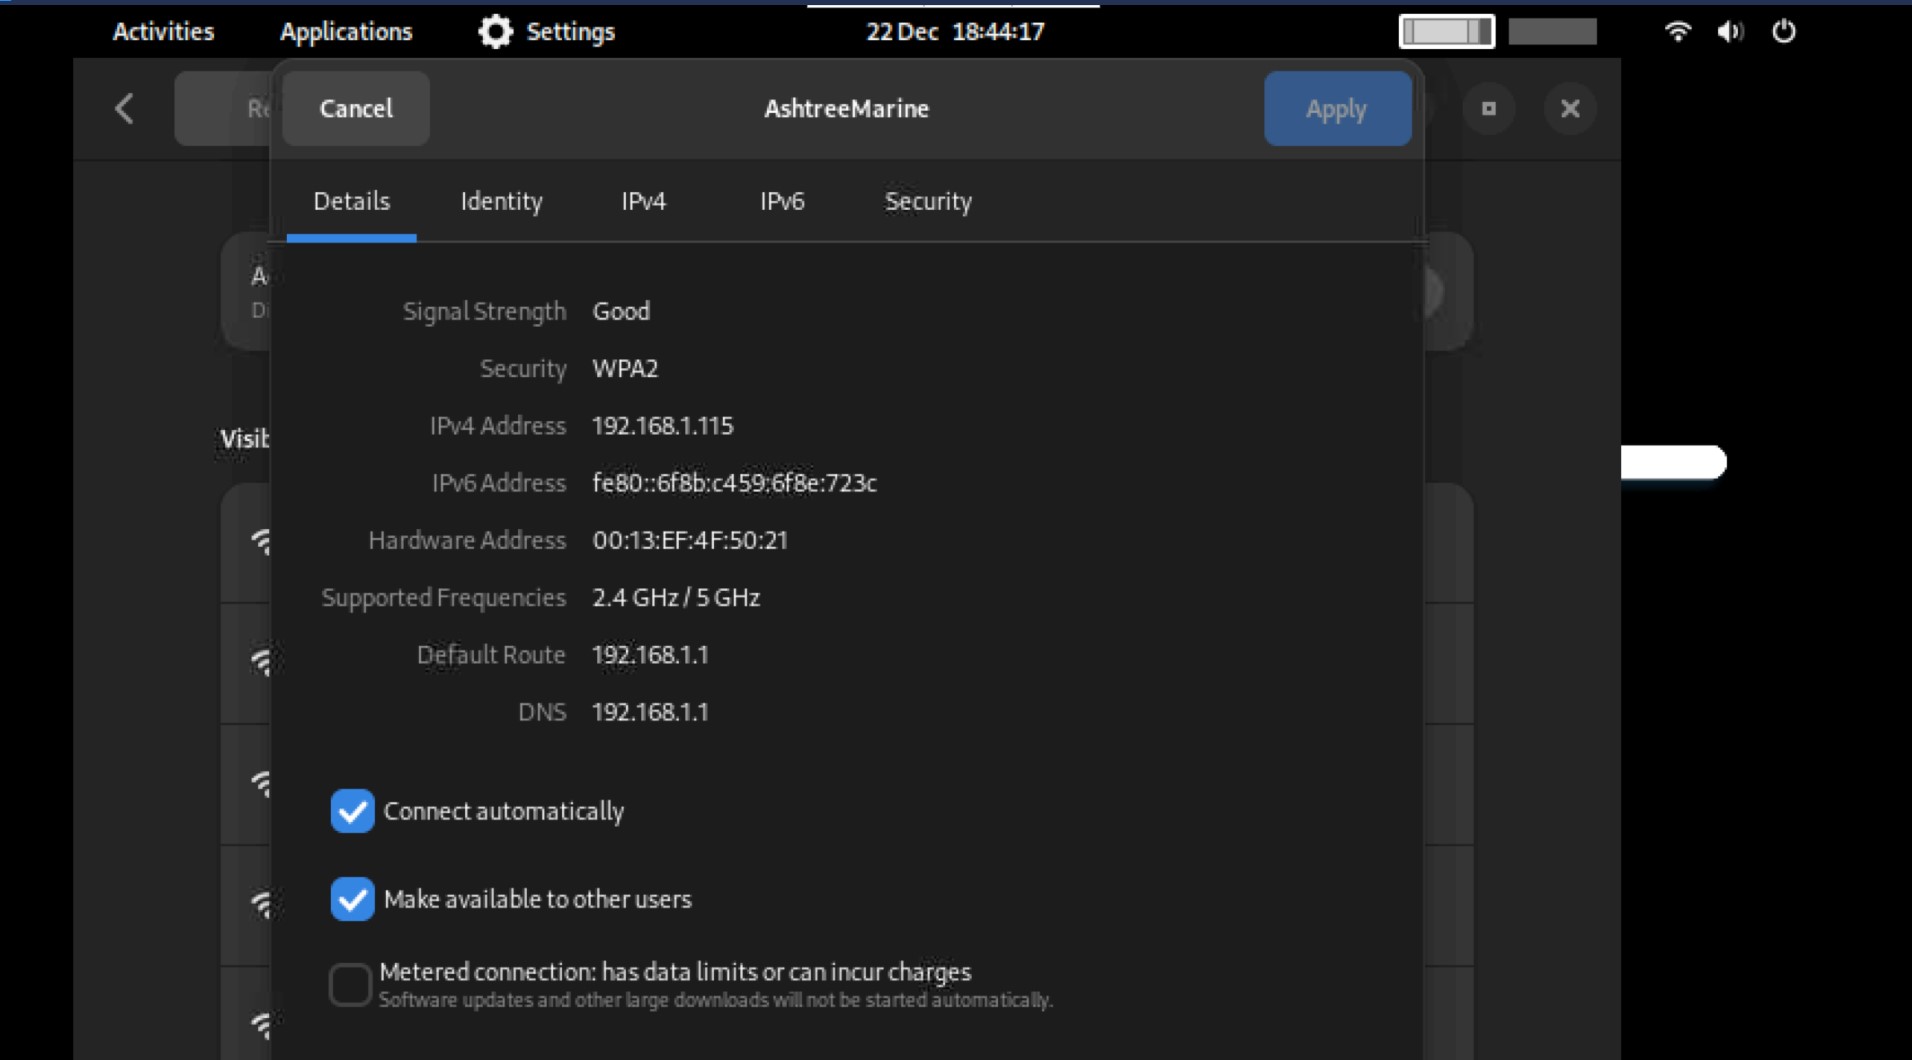
To find the IP Address to click the cog on the top right corner menu.
Then click the Wi-Fi section in setting and the cog next to the connected Wi-Fi connection. That will show you the network configuration details.
You can then connect your computer to the Rockit Server using the VNC Viewer software. Use the IP Address as the VNC Server name.
So now you have a running Rockit Server device and you are connected. Next step is to install the license key for the server software.
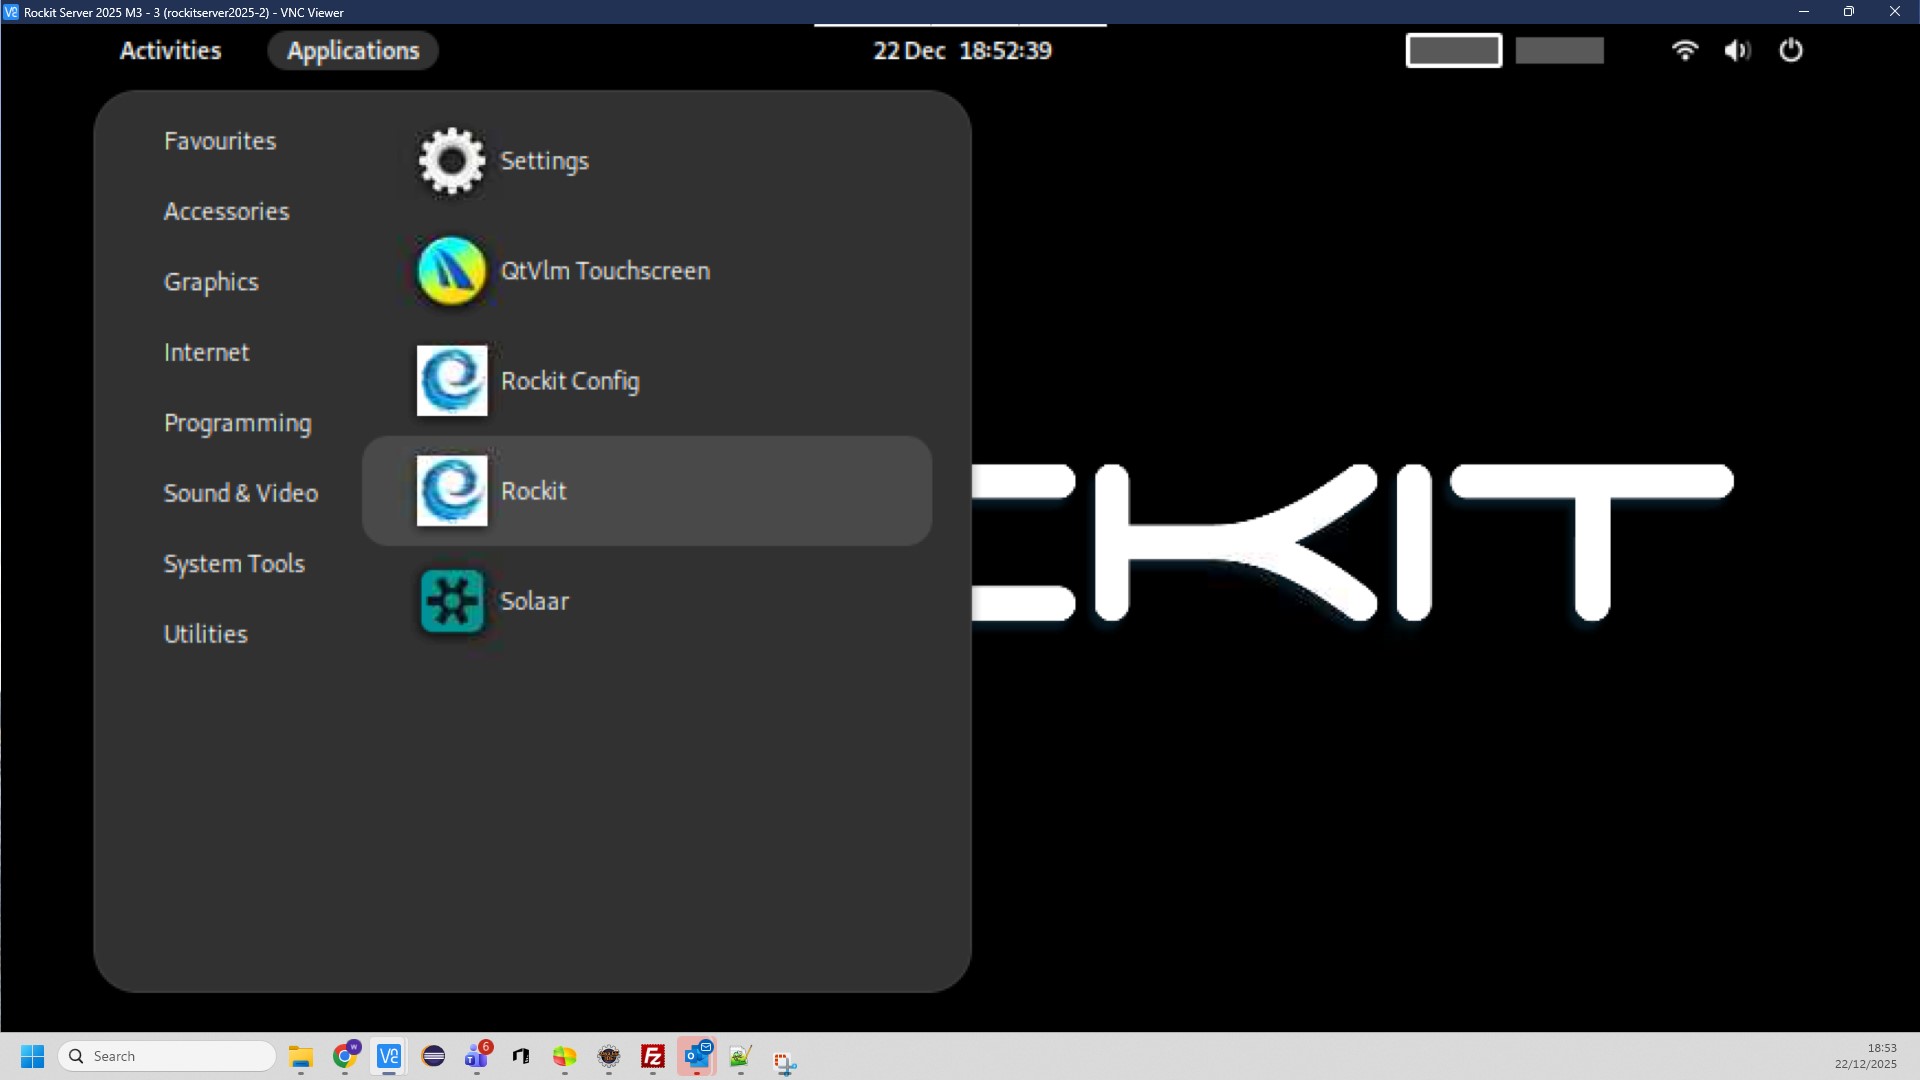
Starting Rockit Analytics from the Rockit Server Menu
On the Rockit Server Applications menu pick the Rockit option to start the Rockit Analytics Software.
You now how a working Rockit Server. Follow the instructions in the rest of this guide to start collecting data.
Test The Application
If you have followed the instructions correctly you should now be able to run Rockit on your Windows computer.
The installation program will have created a Ashtree Marine Program Group on the start menu with 2 options; Rockit Analytics and Rockit Analytics Client Config.
You will also find there is a Rockit Analytics and Rockit Analytics Client Config shortcut on your desktop.
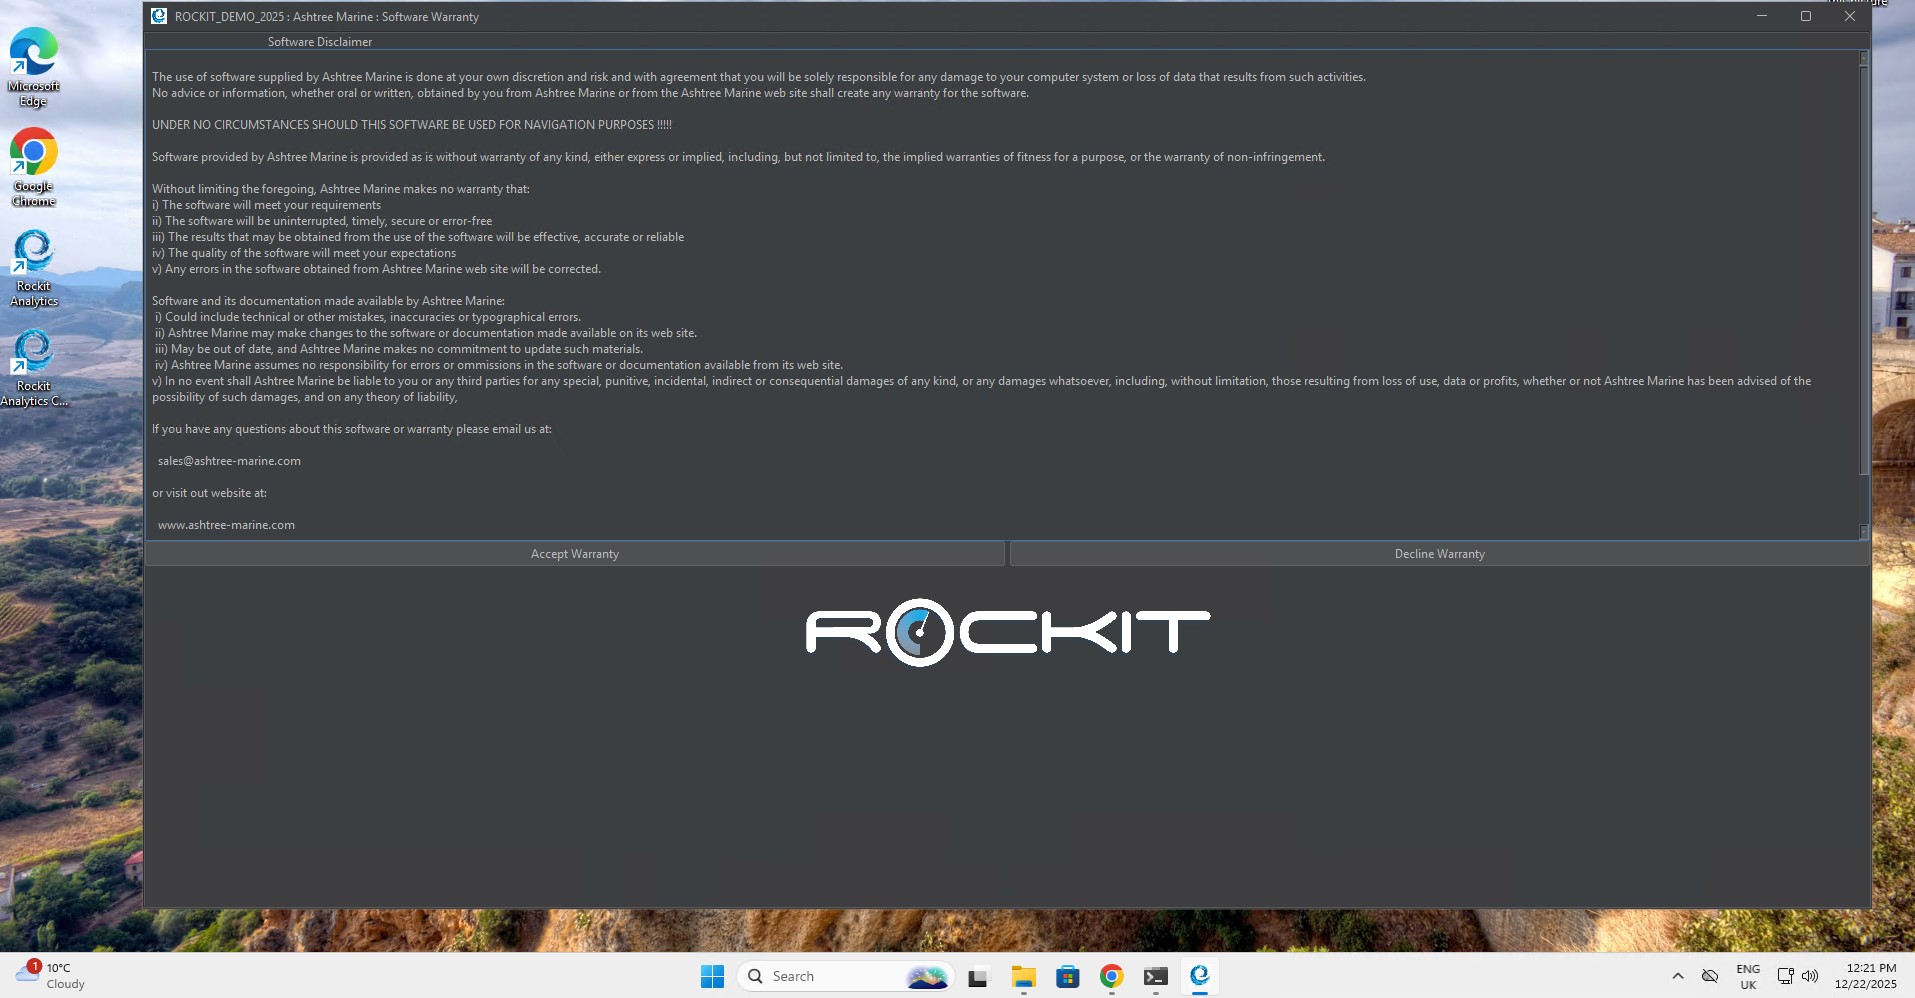
Click the Rockit Analytics icon to start Rockit.
Accept the Warranty and Apply Any Database Updates
We ask you to accept the Warranty each time you start the software.
Its a simple thing but we like to be sure you are not using the software for purposes it wasn’t designed. Primarily navigating on the high seas… If you decline the Warranty the application will close.
Once you have accepted the Warranty you will get the option to Apply Database updates.
We sometimes supply Software Updates. These updates will often include changes to the embedded database that is installed as part of Rockit. The Apply Database button will apply those updates. It can take some time, upwards of 30 minutes, if there is a lot of data in the database, which there will be if you have recorded a lot of sessions, so allow time for the update to complete. You only need to apply updates when you have updated the software installed on the computer running Rockit.
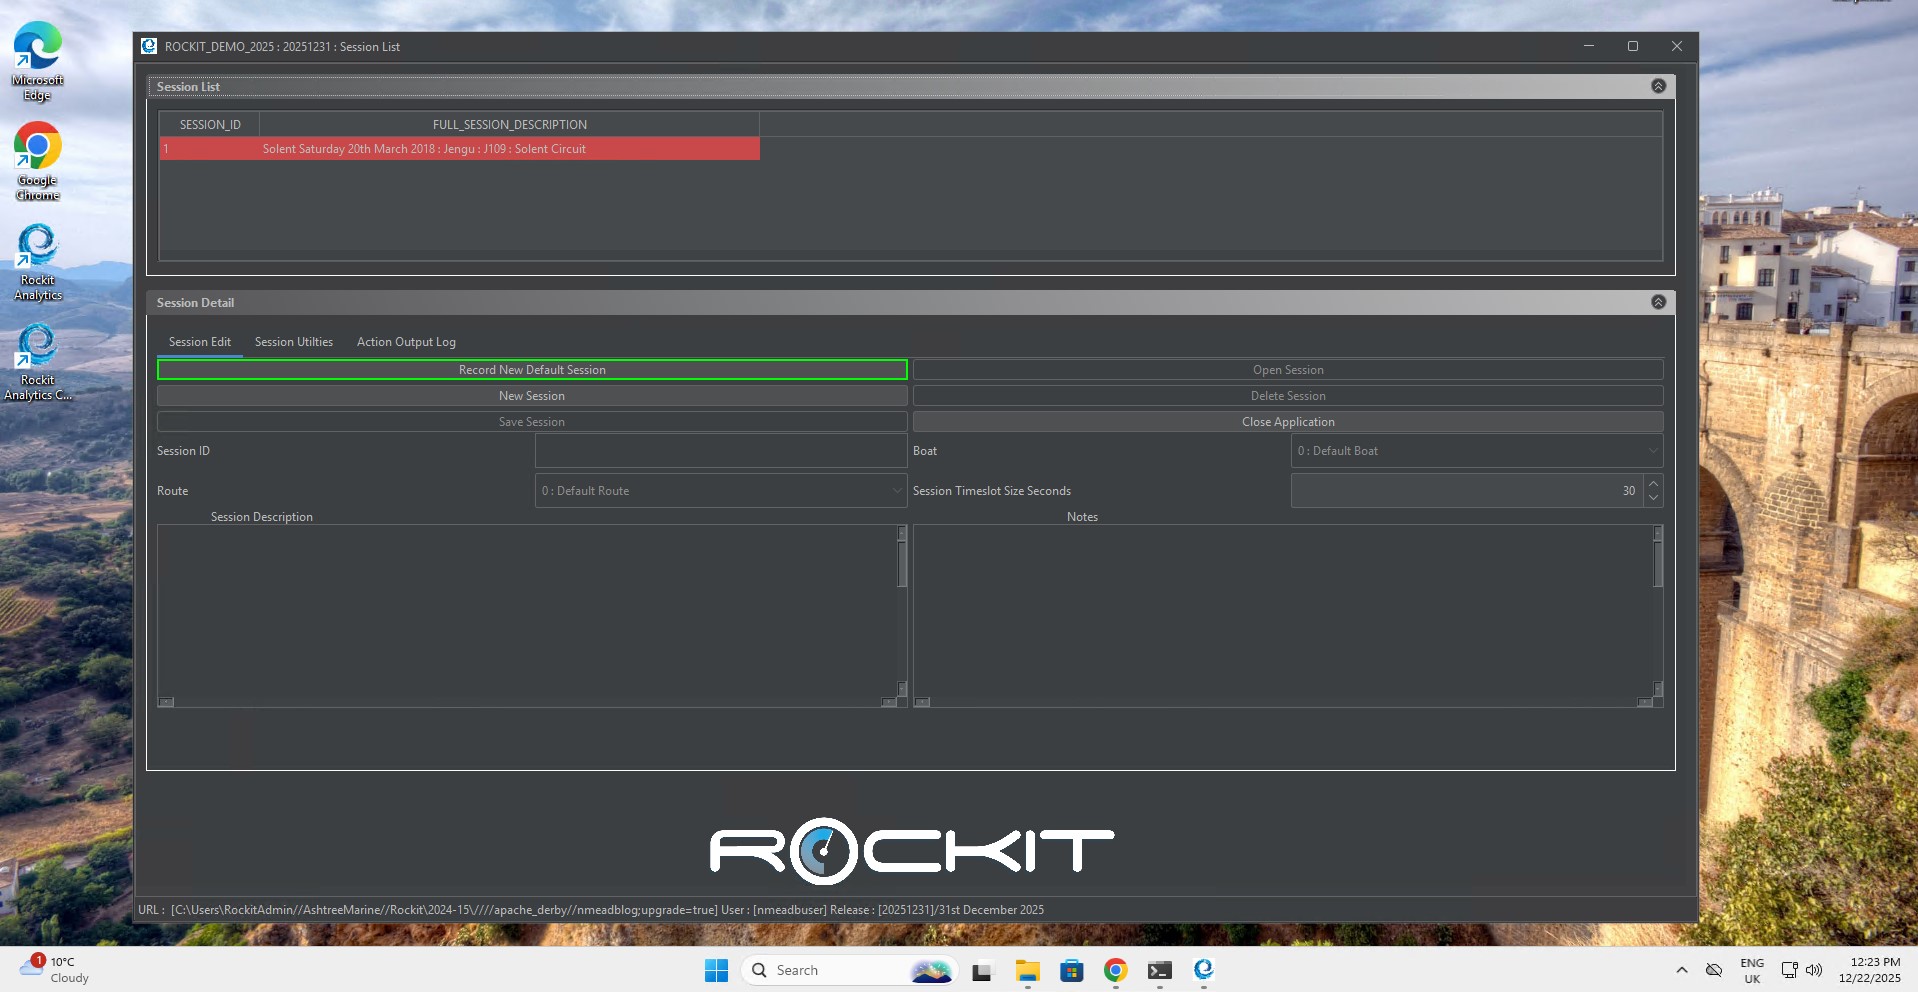
If this is a fresh install you can click No. Clicking No will open the Session List Window.
Review The Demo Data
For a fresh install this will display a demo data set with a single session like the one below.
Initially the software will open using a demo license key.
This limits the software’s functionality in the following way;
- Maximum recorded sessions = 5
- No Rockit Analytics Cloud upload functionality
You can however test collecting data and review the way the Rockit Analytics software works.
Follow the instructions in the next section to load the software key that you should have been emailed when you bought you Rockit Analytics subscription.
Updating The License Key
Once you have installed the software or plugged in and powered up your Rockit Server device you can add the software license key.
You will receive a license key when you buy your server device or Rockit Analytics software subscription. It will look something like;
LICENSE_KEY_CUSTOMER_NAME: [john_smith@googlemail.com]
LICENSE_KEY_EXPIRY_DATE_STRING : [25-May-2014]
LICENSE_KEY_APP_NAME_STRING: [ROCKIT]
LICENSE_KEY: [0nqUA1wgVECyDzSQUnQ9nkdoDTo=]
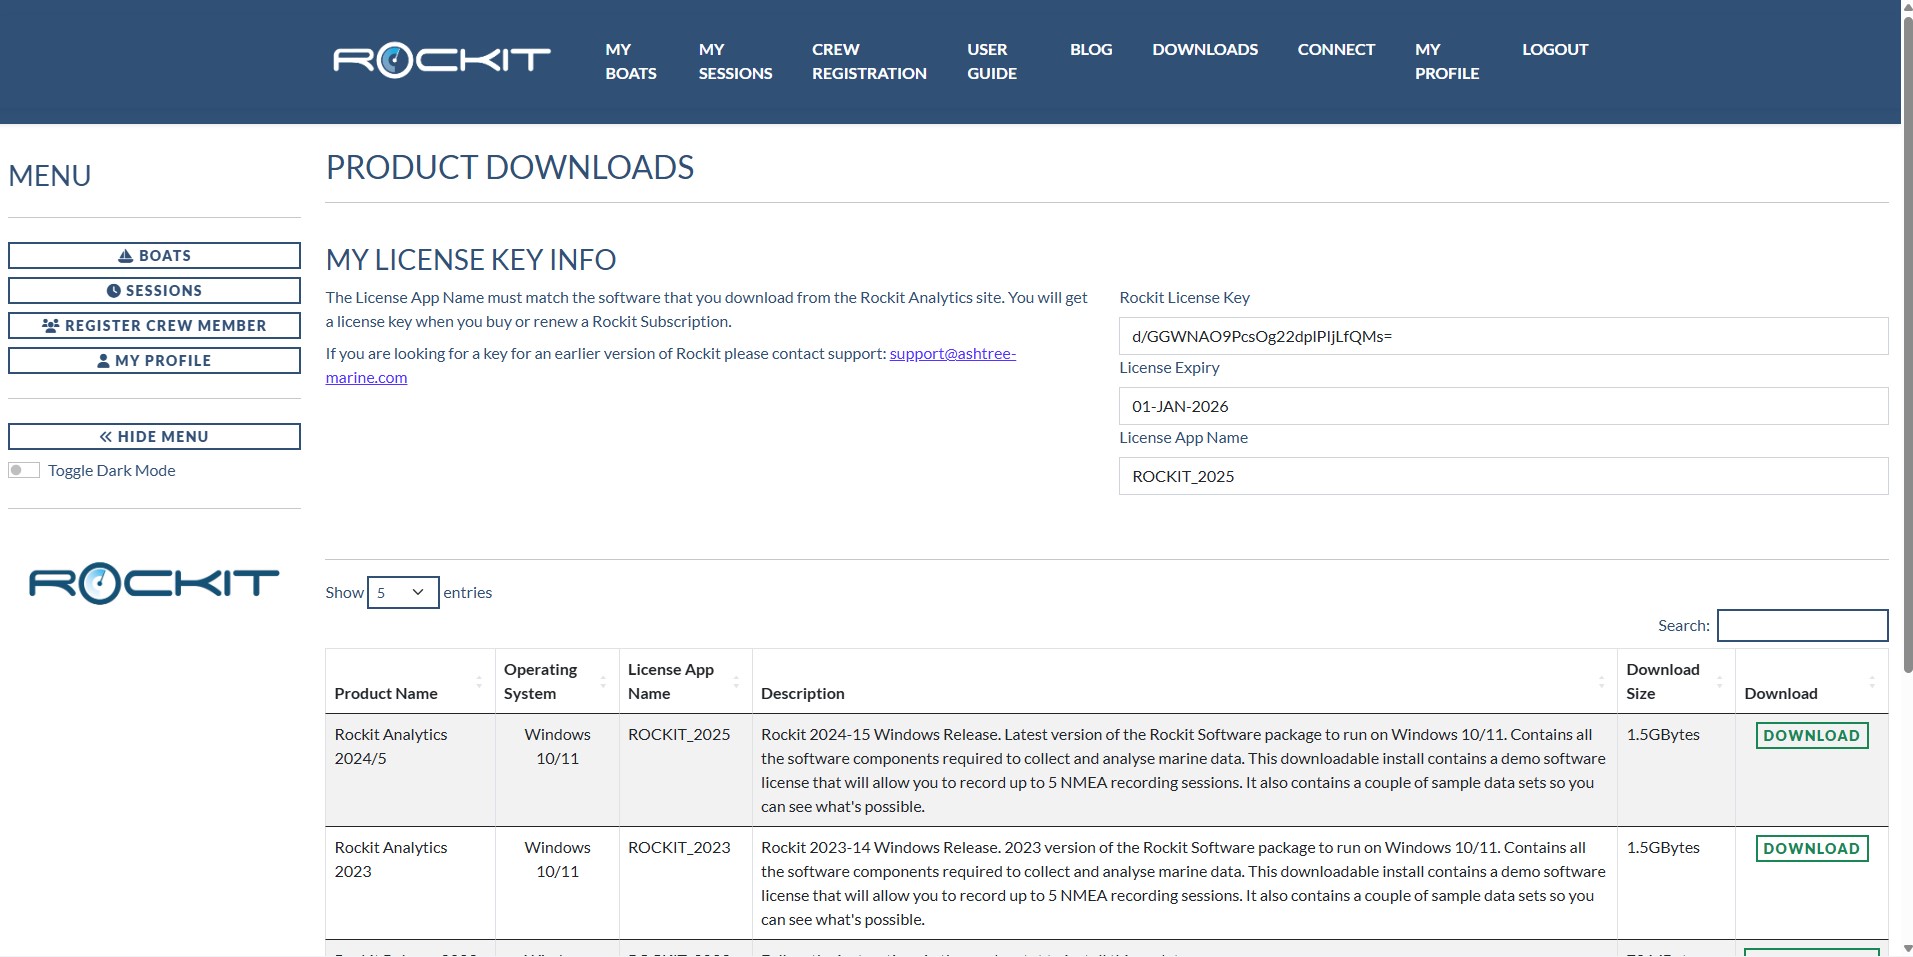
You can also see the Rockit Subscription key on the Downloads page on the Rockit Analytics site. Rockit Analytics Downloads
If you have a valid subscription it should display at the top of the page above the list of software to download. You will need to be logged into the site using the username you will have been sent when you bought your subscription to see the downloads page.
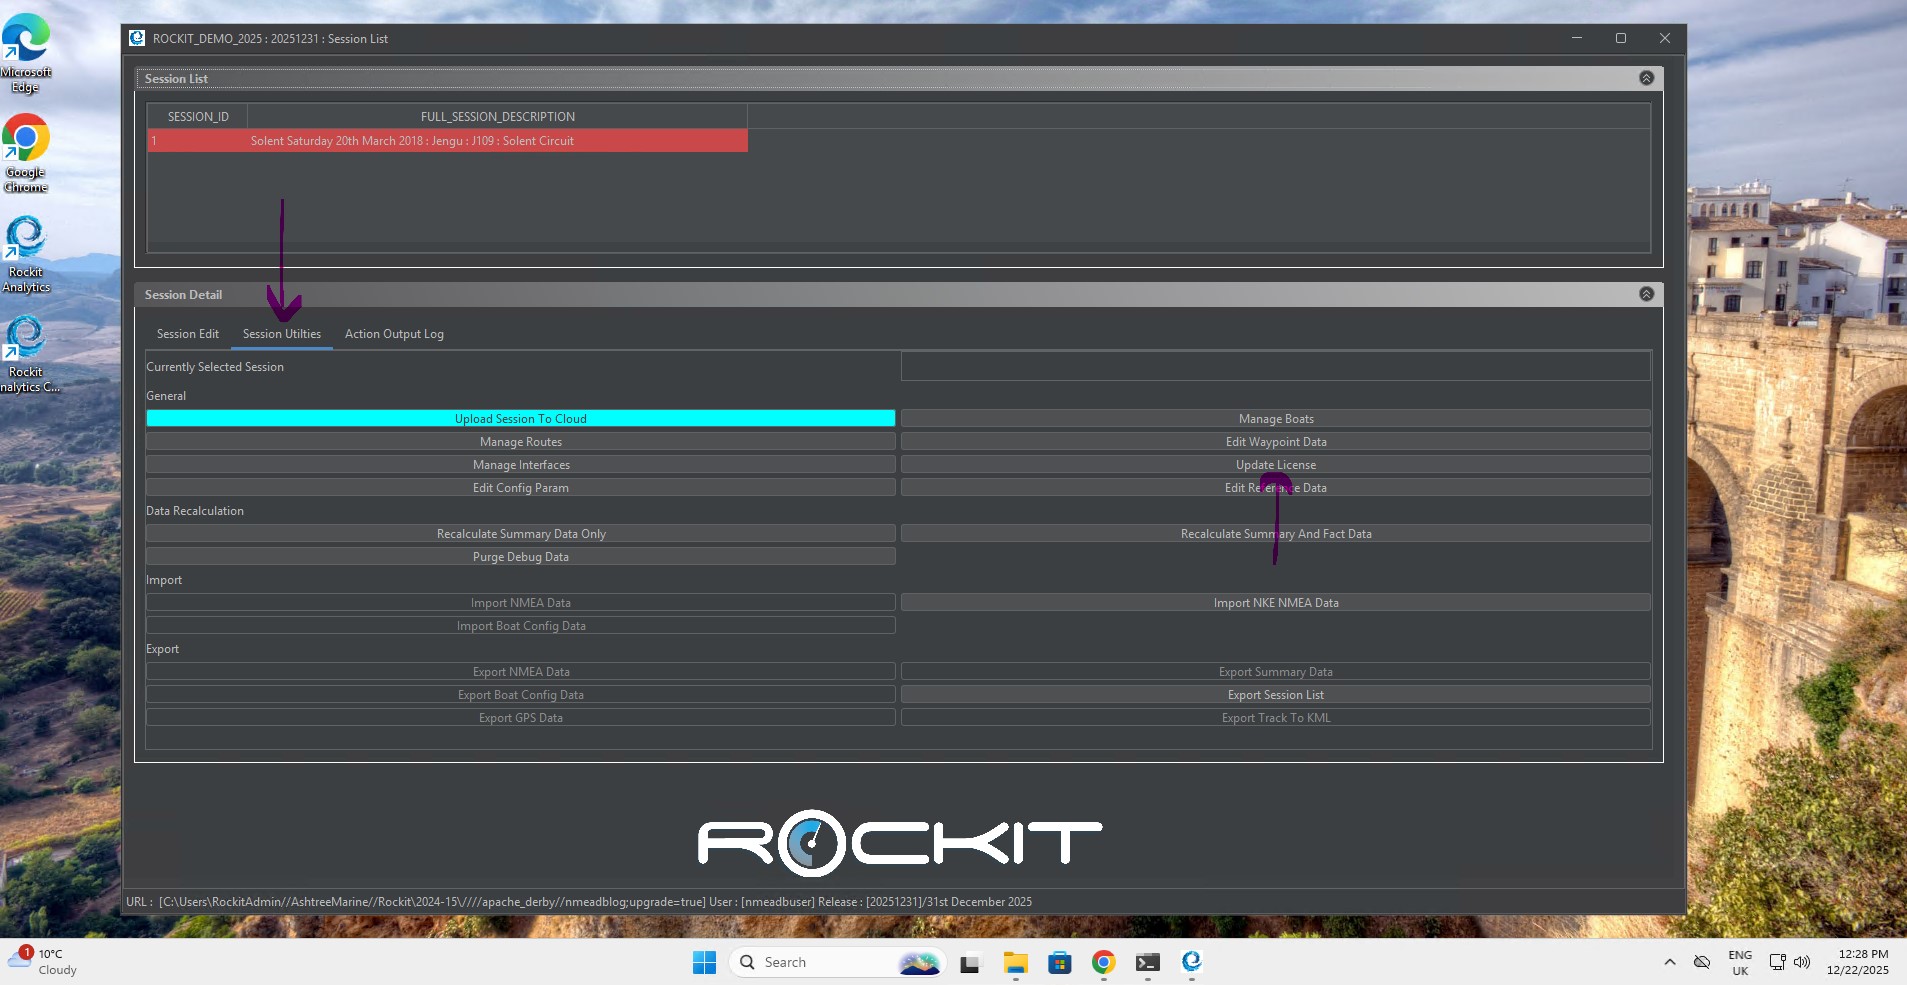
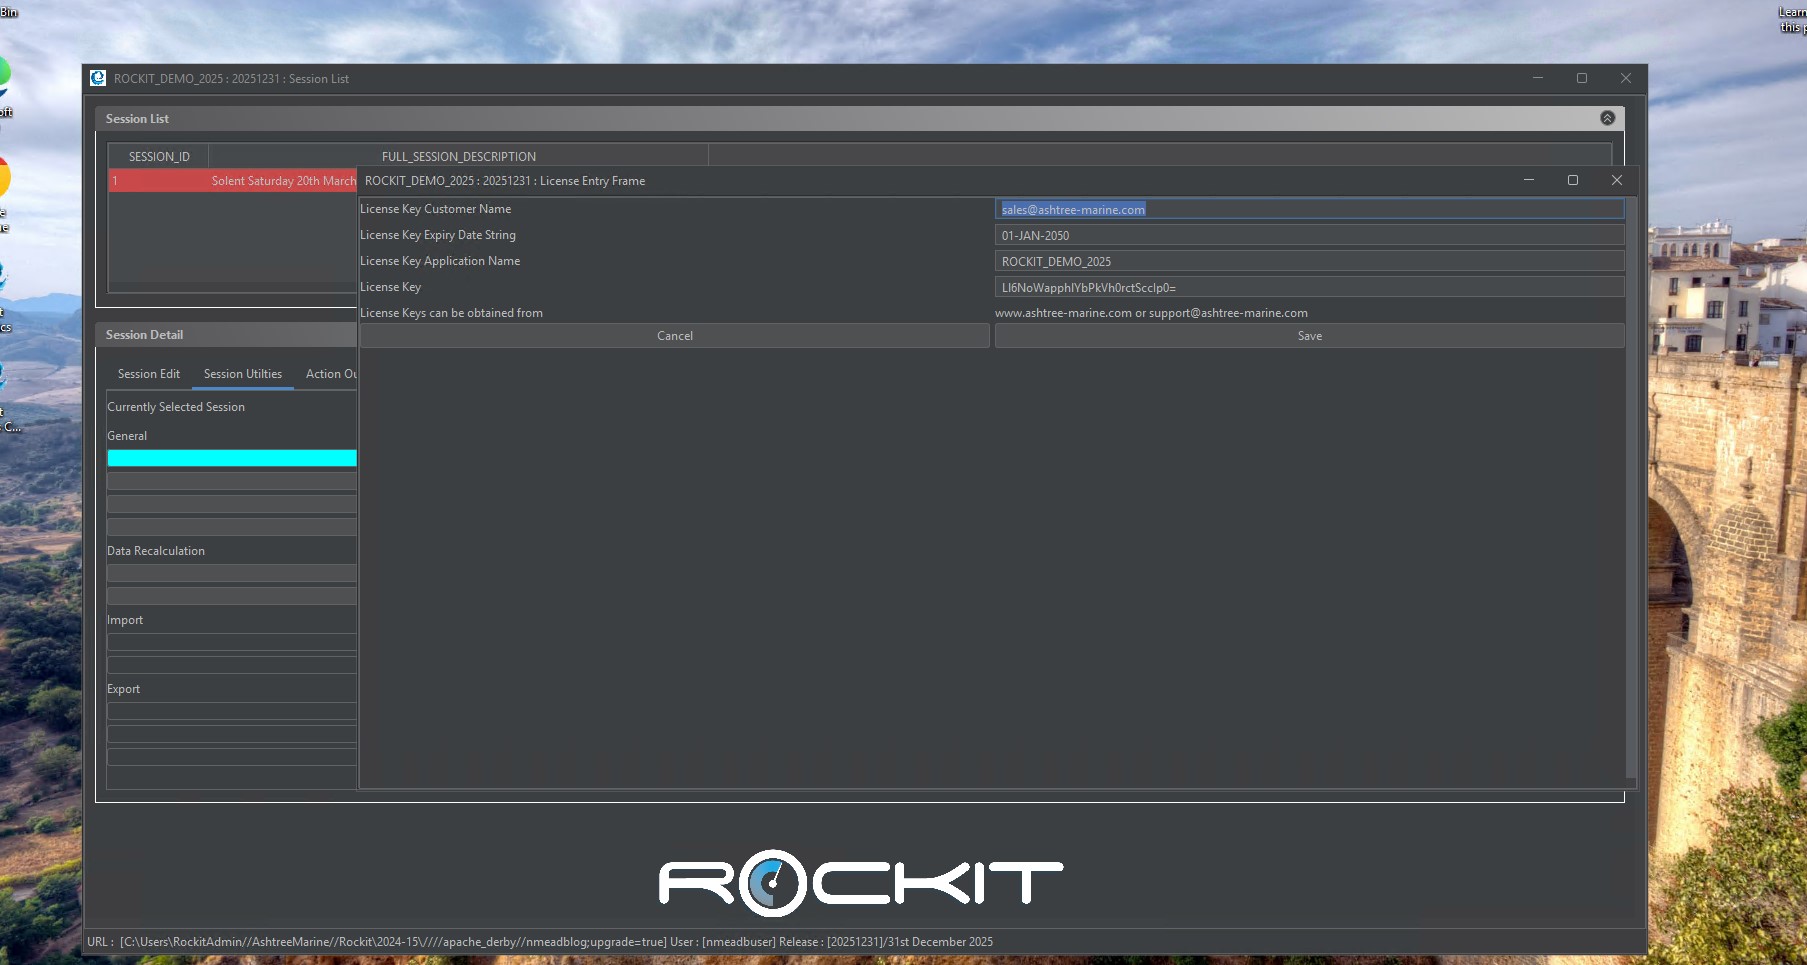
To enter your own license key go to the Session List Panel and pick the Edit License Data menu option.
Enter your license key and related information and press save. Use Cut (Control key + X) and Paste (Control key +V) to cut and paste the long license key into the field. The license key will be validated when you press save. You will get and error message if the key is invalid. The software will continue to work until it reaches the expiry date encoded in the key.
Close the Edit License Screen.
Close and restart the Rockit software. When it reopens it will be using your license key.
Connecting Rockit Analytics To Your Boats Network
Once you have installed the software on your computer you need to connect your computer to the boats NMEA network. In this section we will follow the route below to get data flowing from your boats network into the Rockit database.
- Install a NMEA 2000 to PC interface.
- Connect the computer running Rockit Analytics to the NMEA 2000 to PC Interface.
- Find the port number and host name the device has connected to.
- Tell the Rockit Software about the hardware device you have used to connect it to the boats network.
Install a PC to NMEA 2000 Interface
Most modern sailing boats have networks that run on NMEA 2000 protocol or proprietary variants of that type. We connect the Rockit Analytics to the boats network and collect the data that flows in a small database; the size of the database depends on how much of your sailing you record !
Unless you bought a Rockit Server Model 3 you will need a device of some sort to form an interface between the boat and your PC. The device acts to translate the NMEA 2000 or 0183 traffic into a format your PC and the Rockit Software can read.
Each boat will have its own connection issues. Follow the manufacturers instruction booklet to get the interface device connected to the boat. We resell devices from Actisense because we find them relatively easy to setup and generally reliable. If you get stuck, they also have good technical support that will be able to help you. If you didn’t buy the bundle and don’t have an existing device to connect to you will need to purchase and install one.
We would strongly advise adding the interface device into your boats network in a position where it is easily accessible. You will inevitably need to check its setting look at flashing LED’s and turn it on and off….!
To summarise;
- If you bought a Rockit Server Model 3 it will come with a built in NMEA 2000 connector and the Rockit Software on the device will be setup to pull the data into the database already.
- If you bought a Rockit Server Model 1 then you will be collecting the data via Wi-Fi; you can follow the instructions in this section to setup the connection to that Wi-Fi device.
- If you downloaded the Windows version of the Rockit Analytics software then you have the option of either Wi-Fi connectivity or connecting to NMEA via a USB device.
USB Connections; Finding The Port Number To Connect To.
If you bought the W2K Wi-Fi transmitter then you can skip this step in the process.
Once you have connected the PC to NMEA Connector to the boat you need to connect the USB connection to the Computer running Rockit. You can now insert the USB plug on the PC to NMEA connector into the USB socket. Follow the manufacturers instructions carefully.
If its a Laptop you are using connect the USB interface using an available port.
Finding the USB Port that a Serial Device is using on a Windows Computer.
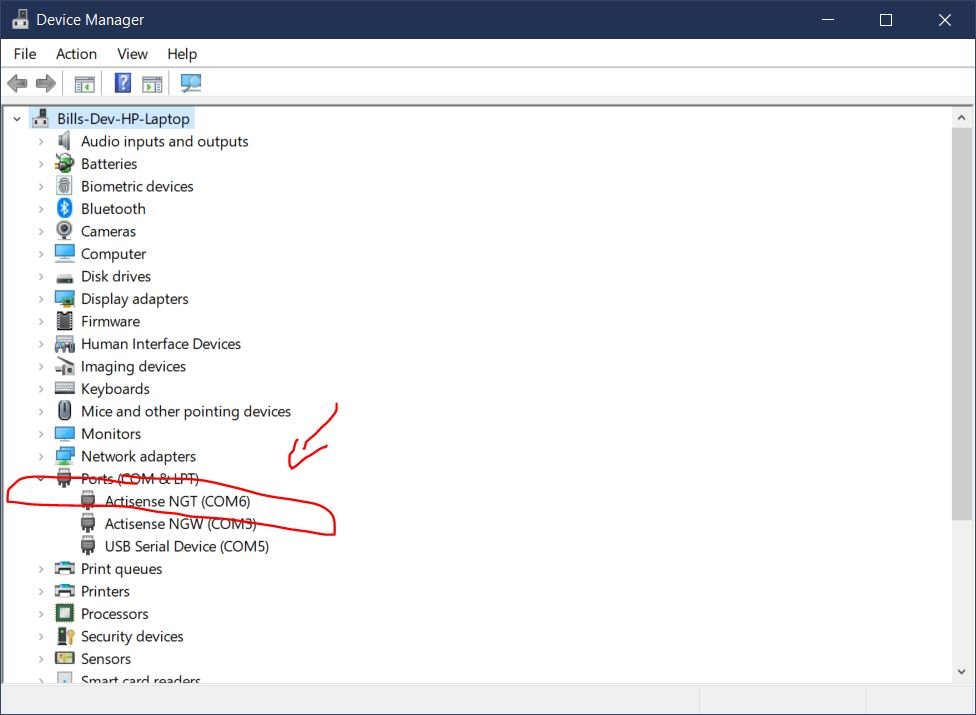
If you are using an Actisense NGW or NGX or an Yacht Devices YDNU device you need to plug the USB connection into the Laptop with the Rockit Software Installed. Then open the Windows Device Manager to find the port number;
In the search field on the Windows Toolbar type device. That should find the Device Manager. Click on it to open the Windows Device Manager.
Expand the Ports (COM & LPT) node in the tree control. Any Actisense or Yacht Devices USB devices attached to your computer should be listed there along with the port number. For example COM6.
For a USB connection the hostname will always be 127.0.0.1 as the device is connected to the computer locally.
Wi-Fi Connections; Finding the Hostname and Port Number To Connect To
In the next step we need to tell Rockit Analytics where to listen for its NMEA data. But we first need to do some detective work to get the hostname or IP address of the device that is transmitting the NMEA Data.
Finding the Hostname and Port Number To Connect To For An Actisense W2K Device
If you are using an Actisense W2K device you will need to log into the administration console for the W2K and find the following information.
Follow the Actisense instructions to connect using Wi-Fi to the W2K device.
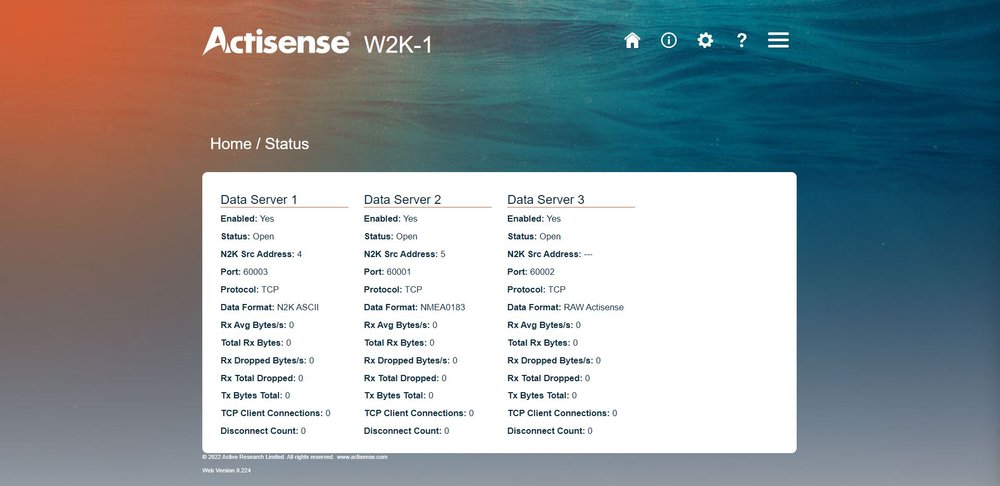
Once logged in navigate to Status Page.
- To collect NMEA 0183 data over Wi-Fi you are interested in the Port number for Data Format NMEA0183. In the screenshot on the right the Port number is 60001.
- To collect NMEA 2000 data over Wi-Fi you are interested in the Port number for Data Format N2K ASCII. In the screenshot on the right the Port number is 60003.
If neither NMEA0183 nor N2K ASCII is showing you are going to need to reconfigure you W2K device to change the the data formats outputted.
Follow the Actisense device instructions to achieve that.
The hostname will be the IP address that you used to connect to W2K browser admin console.
The approach for other Wi-Fi transmitters will be similar. You will need to check that the Wi-Fi device you have is supported by the Rockit Analytics programme. If in doubt get in touch with Ashtree Marine Support.
Tell the Rockit Software about the PC to NMEA Interface connection
Once the cables are connected and the Rockit Server Device/Windows Computer has booted and your boats Navigation systems, are running up open the Rockit Analytics software.
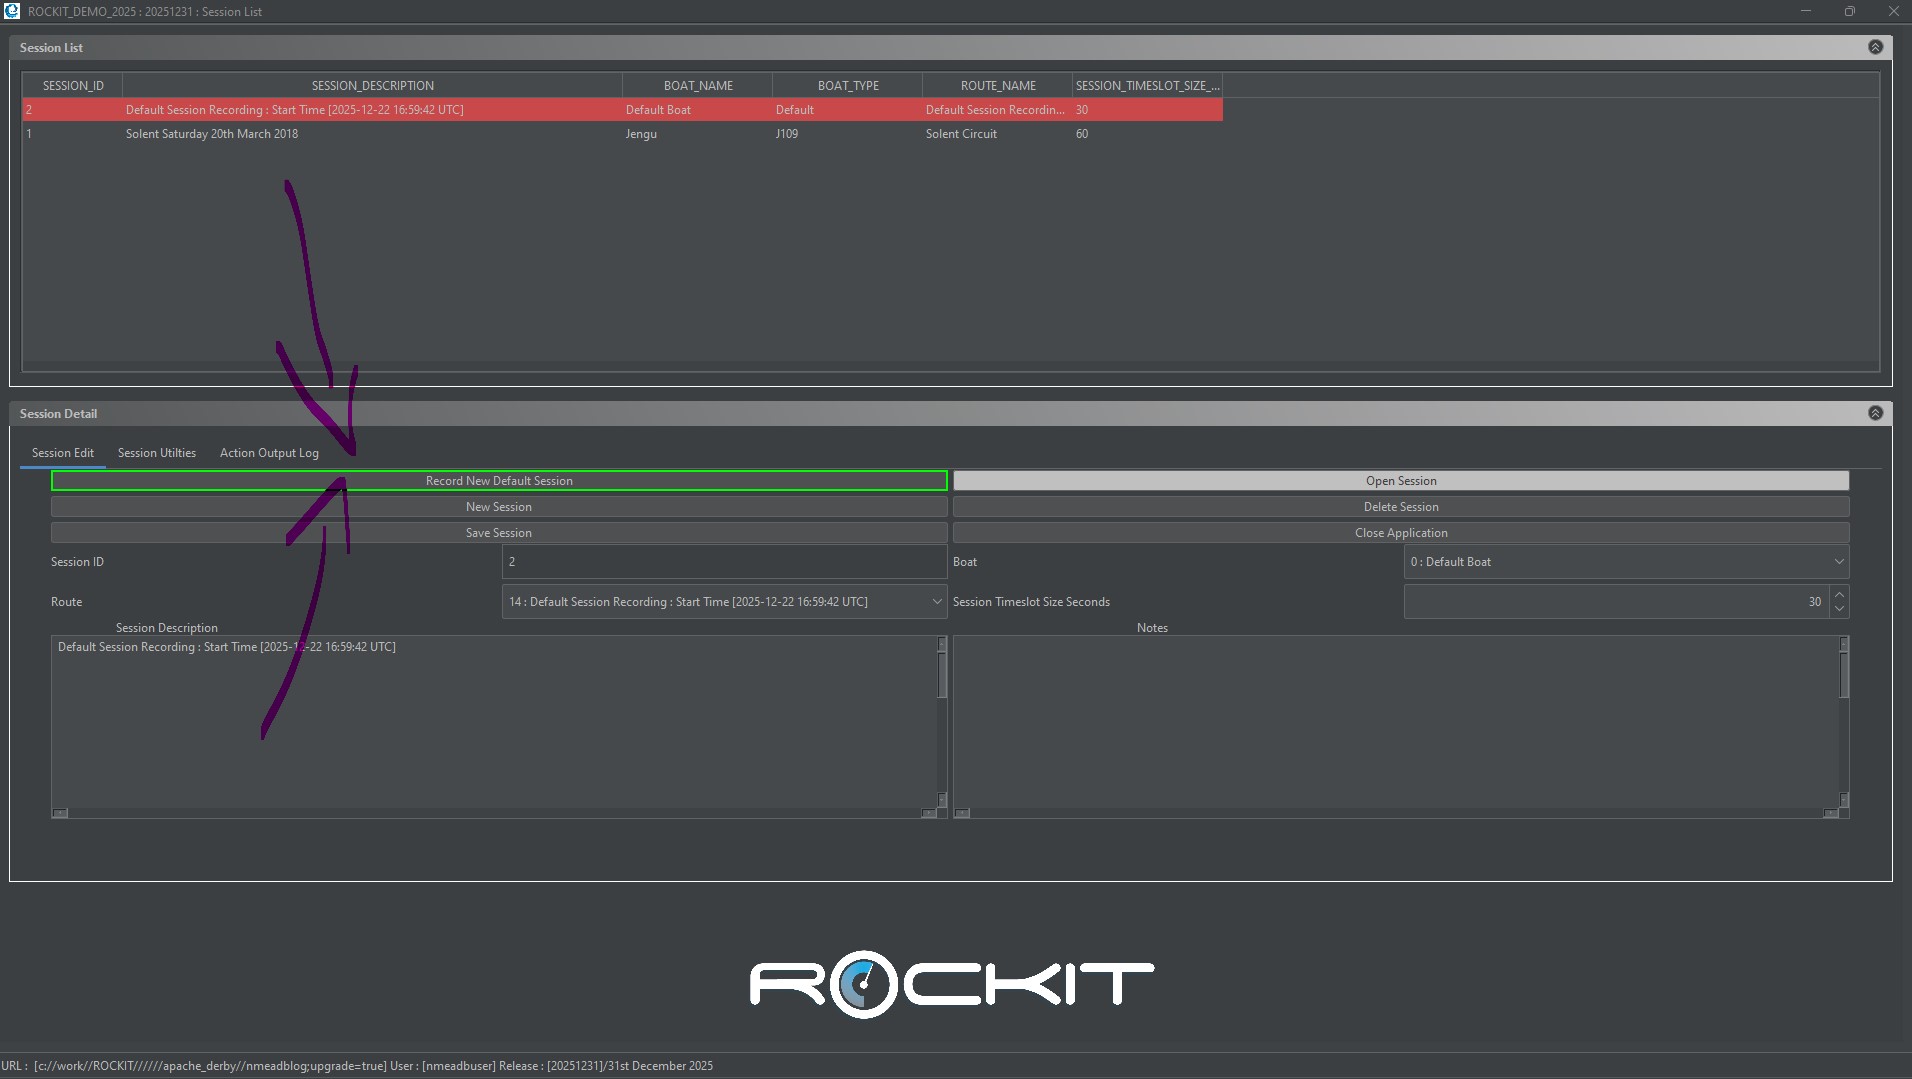
On the Session List screen click the button Manage Interfaces to open the Interface List Screen.
This should bring up the Interface List screen below. Follow the instructions below to create a new interface record. There are various demo Interface definitions already in the Rockit system so you can refer to those for guidance.
- Press New Interface Definition to create a blank record
- Give the Interface a name.
- Select the protocol. This will depend on the device being using to connect to boat and whether it is able to output data in NMEA 0183 or NMEA 2000 format. So the options are COM-0183, COM-2000, TCP/IP NMEA 0183 or TCP/IP NMEA 2000. COM will be selected if you are using a USB serial device, TCP If you are using a Wi-fi based method of transmission.
- Enter the Hostname. For a COM/USB connections this will always be 127.0.0.1. If you are using a W2K transmitter this will be the IP address of the Wi-Fi transmitter. Refer to the Actisense guides to set up the W2K. You will need to access the W2K browser based admin console to configure the data output ports; see the previous sections for details..
- Enter the Port Number. See the table below for options for the Port number.
- Baud Rate, Data Bits, Stop Bits and Parity will only apply to certain types of Serial connection and do not apply in the case of USB Serial connections.
- Set the Default Interface Flag. If this is a Rockit Server that will only every connect to one boats network and will never leave the boat you will probably only have one record in the Interface Definitions List other than the Demo data. You can make that record the Default Interface so that will always be the one that Rockit uses.
- Press the Save Definition button to save the Interface Definition to the database.
This is the full list of field names and potential values for an interface definition.
| | TCP/IP | COM | Description |
|---|
| Interface Name | TCP connection 0183 MyBoat | TCP connection 0183 MyBoat | The name assigned to the interface. Something sensible that will make sense later. |
|---|
| Protocol | TCP – Wifi or Ethernet | Serial/USB Connection | TCP /UDP for network connections; COM for serial connections using COM or USB Ports (with adapter). |
|---|
| Host | Host name or IP Address | Will always be 127.0.0.1 | The host name of the computer from which the data is being extracted |
|---|
| Port | eg. 2000 | eg COM4 | The port number the computer collects data from. Refer to the PC to NMEA interface devices instructions. |
|---|
| Baud Rate | Not Applicable | eg 9600 | For COM Ports only — depends on device type. Refer to PC to NMEA interface instructions (not USB). |
|---|
| Data Bits | Not Applicable | 8 | For COM Ports only — depends on device type. Refer to PC to NMEA interface instructions (not USB). |
|---|
| Stop Bits | Not Applicable | 1 | For COM Ports only — depends on device type. Refer to PC to NMEA interface instructions (not USB). |
|---|
| Parity | Not Applicable | 0 | For COM Ports only — depends on device type. Refer to PC to NMEA interface instructions (not USB). |
|---|
| Default Interface | Yes/No | Yes/No | Set this as the default interface used on the session recording screen. If you only record from one boat, make that the default. |
|---|
Testing It All
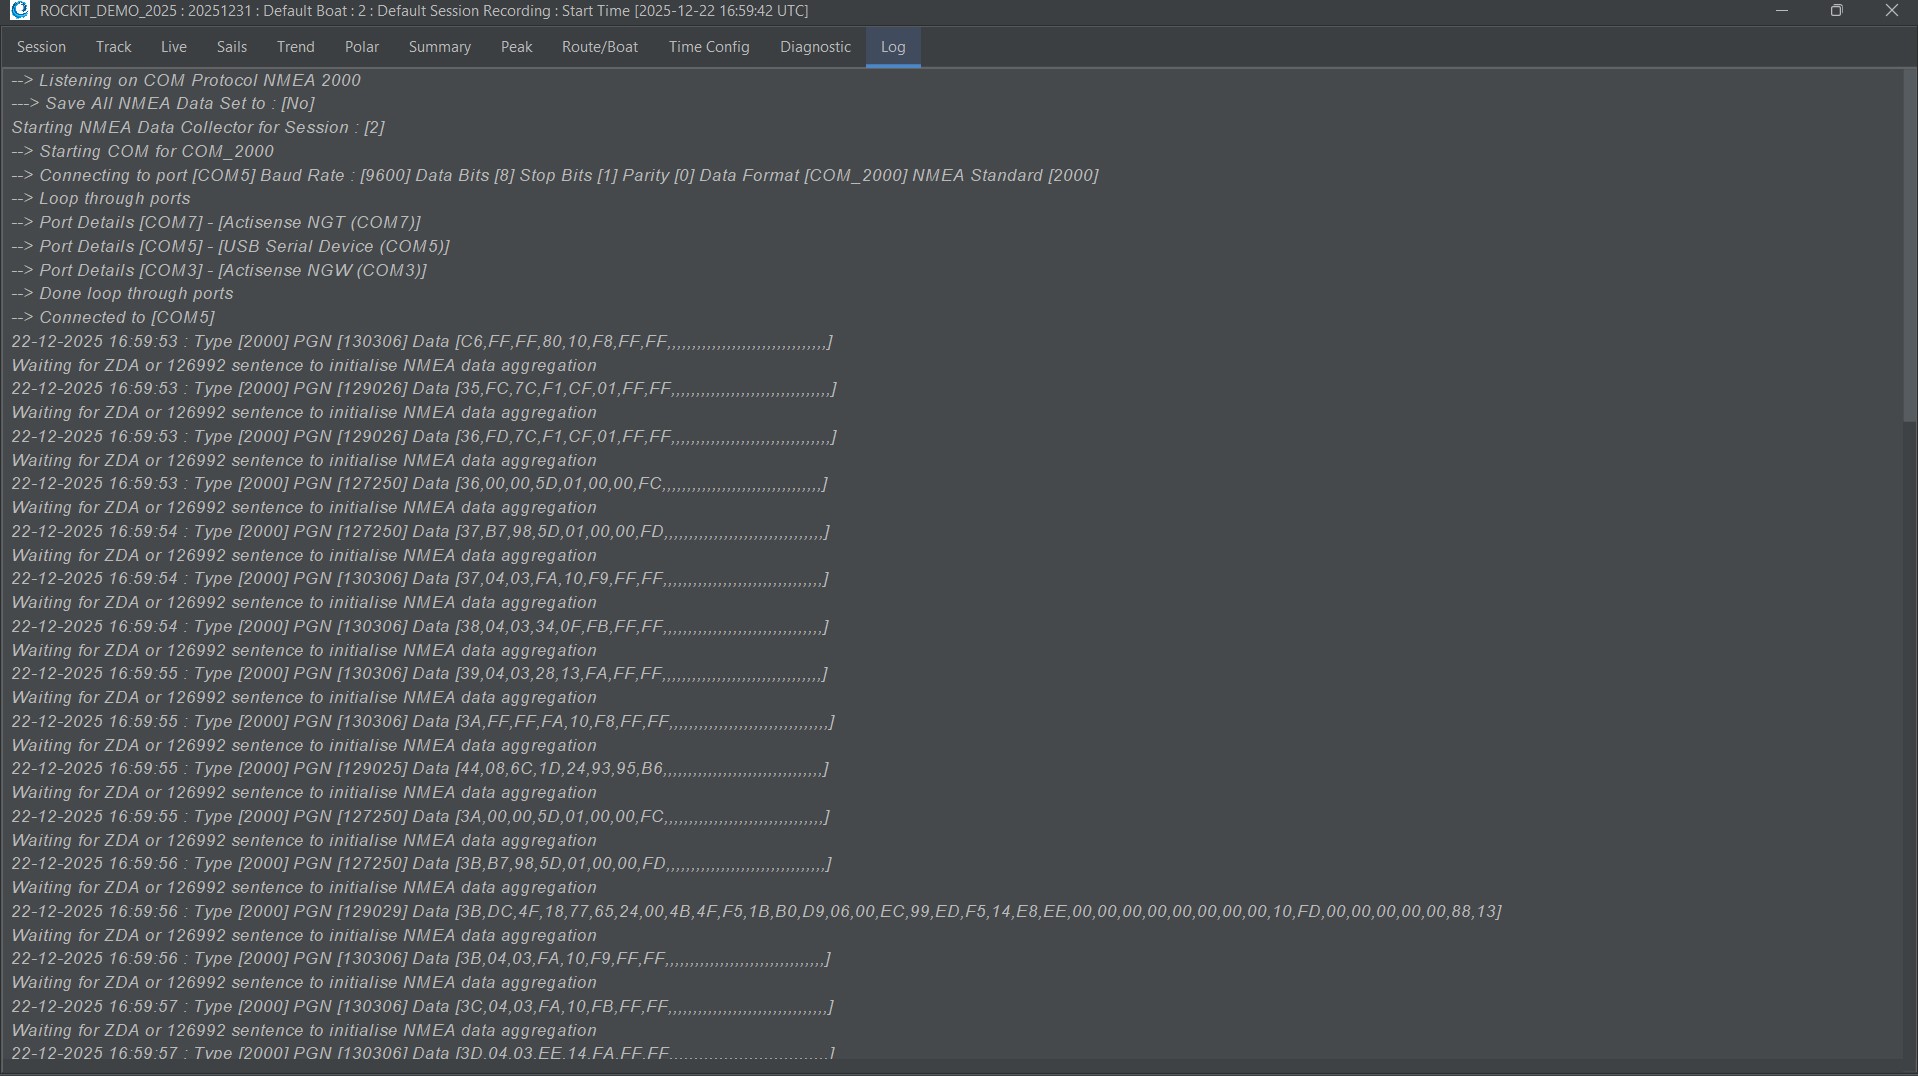
The easiest way to test everything is to hit the Green “Record New Default Session” button on the Session List panel.
That will run a recording session against the system default as they are installed; default boat, default interface that you just setup, default route etc.
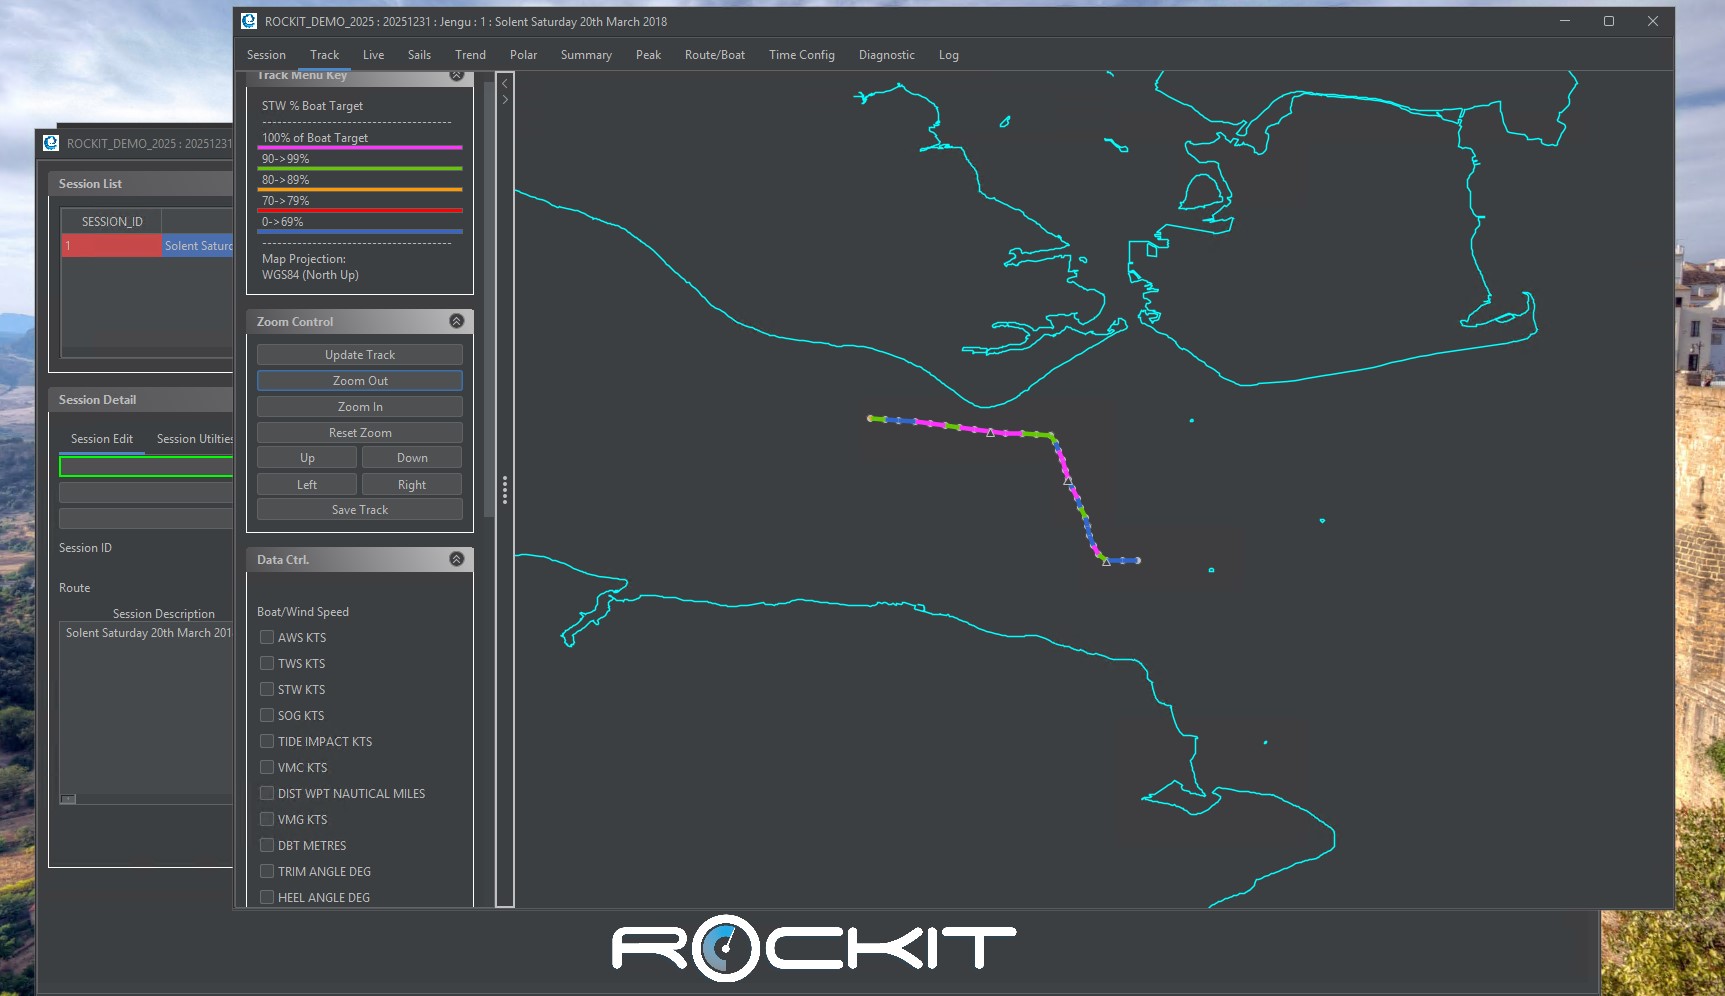
When you press the button the system will start a new recording session. The Recording Data Session Window will open and you will get an information log appear on the screen. That will tell you exactly what the system is doing; where its connected to an whether its getting any data.
As you can see from the image above the system once connected to you data source will wait for an NMEA time sentence; ZDA if you are connected to NMEA 0183 or 126992 if you are connected to an NMEA 2000 source. Rockit Analytics will record everything against the NMEA GPS time not the PC time so if thats not on the NMEA bus/network it will never actually record anything. It will just sit there waiting; that shouldn’t be a problem if you have a working GPS receiver attached to the network at thats where Rockit gets its location in time and space from.
Once the Time signal has been received it will start to actually record the data it is reading.
Thats the final stage in the process your Rockit Analytics software is now successfully collecting data from your boat. You can now move on to the sections in the user manual that talk about how to setup you Boat, Boat Configuration and Routes…
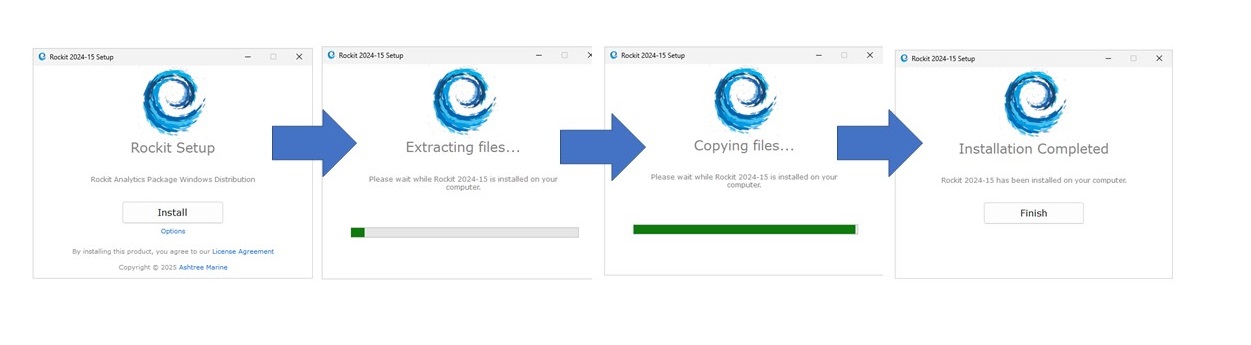 Let the installation progress to its completion dialog.